The Wildcard Find & Replace MacroWildcard Find & Replace has new functionality. The image below shows the new Manager interface: 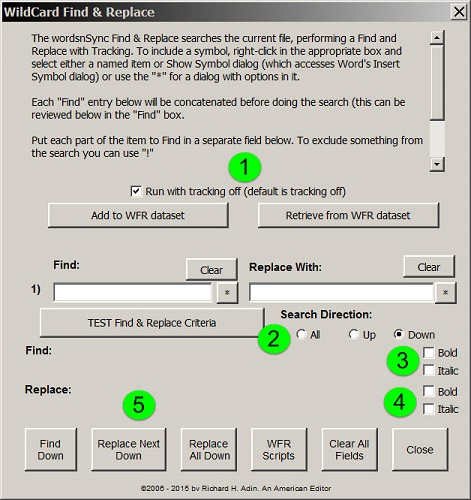
The original Wildcard macro worked well but lacked some needed functionality. This release provides some of the missing pieces. Wildcard macros run best when tracking is off. However, sometimes we want tracking. And when we do, we sometimes forget that the last time we ran a Wildcard macro, we did it with tracking off. Consequently, the checkbox (#1) has been added, with it being checked the default. If you want to run a macro with tracking on, decheck the box, but know that next time you open the macro it will be rechecked. Another problem with the original version was that the macro ran in just one direction — Down. That meant part of a document may not have had the macro run on it. With this release, you can now set a macro to run Up, Down, or All (both Up and Down) (#2). Another omission in the original version of Wildcard Find & Replace was that you could not search for bold, italic, or bold-italic, nor could you replace and apply those attributes. You can now do so by checking either bold or italic or both bold and italic (#3 and #4) — but the Find and the Replace attributes are done separately; that is, you can checkmark bold in the Find (#3) and italic in Replace (#4), as shown here: Depending on your direction choice, the buttons (#5) will reflect your options. Because in the above image Down is the selected option, the buttons reflect Find Down, Replace Next Down, and Replace All Down. As shown in the image below, if we select Up as the direction (#6), the choices change to Find Up, Replace Next Up, and Replace All Up (#7). 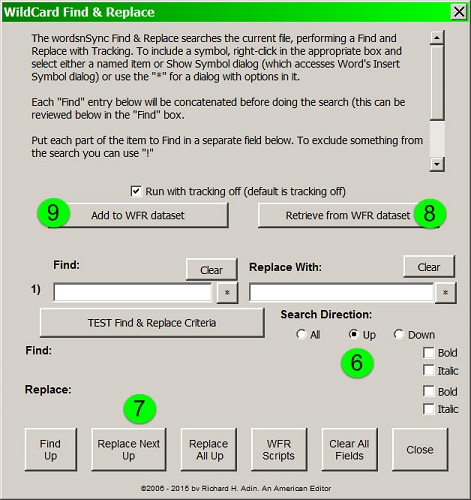
New functionality has also been added to the Dataset dialog that is accessed by clicking Retrieve from WFR dataset (#8). The Dataset dialog is shown here: 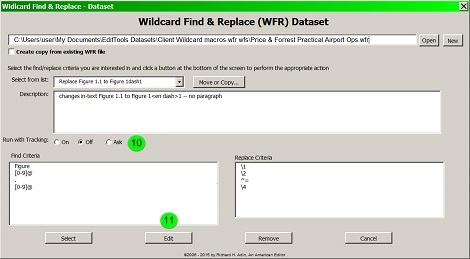
Now you can set a Wildcard macro to run with tracking on or off or have the macro ask you each time (#10). Through this dialog, you can also change the instruction to the macro; that is, if you have selected off but now want to be asked, you can make the change here. The more important new functionality, however, is found with the new Edit button (#11). Clicking Edit opens yet another dialog, the Edit Criteria dialog shown here: 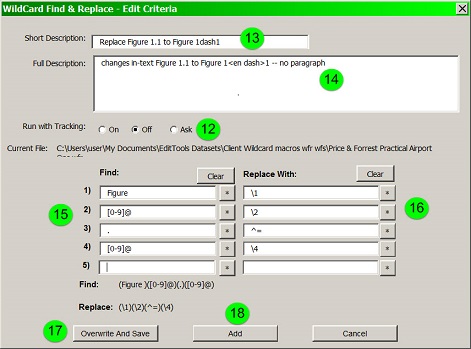
Again, in this dialog you have the ability to set the tracking criteria (#12). More importantly, this is the place where you can comprehensively edit an existing Wildcard macro. You can modify the short description (#13) and/or the full description (#14) of the macro. It is here where you can modify either or both the Find (#15) or the Replace (#16) criteria. For example, if you find that when a macro is run it isn't finding what you had expected it to find, you edit the macro here. Clicking Overwrite and Save (#17) saves the new information by overwriting the previous information. If instead of replacing an existing macro you want to create a new variation and keep the original, click Add (#18). All of the changes you have made in the Edit Criteria dialog will be treated as if you had created a new macro. In the primary Wildcard Find & Replace dialog above, the other option is to Add to WFR dataset (#9) rather than Retrieve (#10). Here the only change from the previous version is to again give you the tracking options (arrow) before you add the new macro to a dataset. 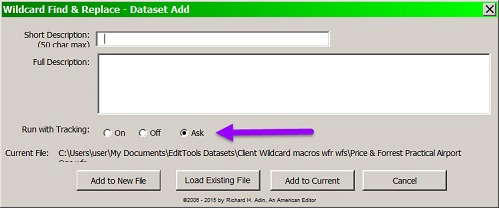
The Wildcard Find and Replace (WFR) macro, found on the Other menu of EditTools, is designed to make it easy for an editor to use the powerful wildcard find and replace function of Microsoft Word. WFR is for both the editor who is experienced with wildcards and the editor who is new to wildcards. Original Wildcard Find & ReplaceThe main screen of WFR is as shown below. 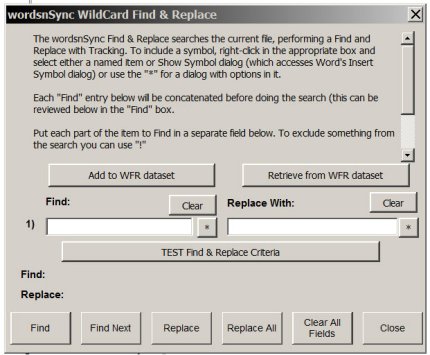
Begin by entering the Find criteria in the Find field. Up to 9 fields are available. Each Field is designed to contain a single Find element. For example, assume that the information we want to search and modify is that shown in this figure: 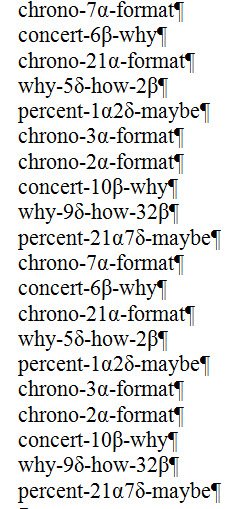
Assume that what we want to do is change, using the first entry as an example, the order from the current order of chrono-7α-format to 7α-chrono-format. We would make our entries in the Find and Replace fields like this: 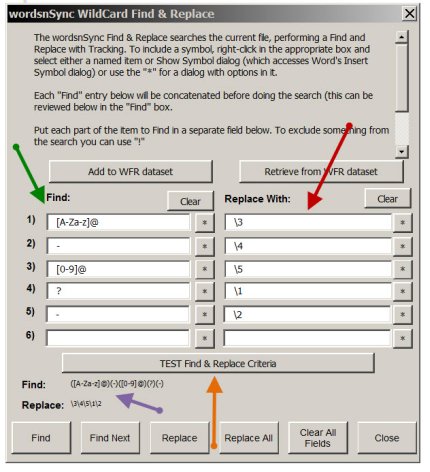
We used 5 fields to define our Find criteria (green arrow) and then reordered the Find criteria in the Replace With fields (red arrow). The macro shows what the actual Find and Replace criteria are (purple arrow), which gives advanced users additional information. But we don't know whether the criteria we entered will actually find what we want and if it does find what we want, change it to what we want. Thus the TEST Find & Replace Criteria button (orange arrow). The Test F&R gives you a chance to make sure everything is as you want before letting the macro run over your complete document. Clicking Test F&R causes the macro to highlight the first instance of what the Find criteria will find and asks you if this is correct: 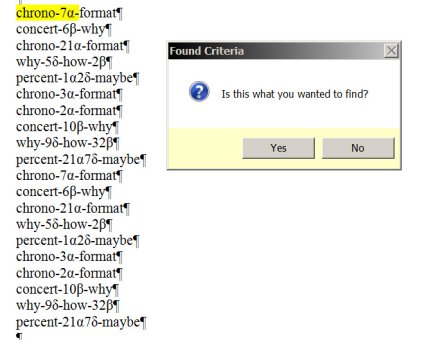
If you click yes, the macro then makes the change called for by the Replace criteria and asks if this is the change you intend. Note that all changes are with Tracking ON: 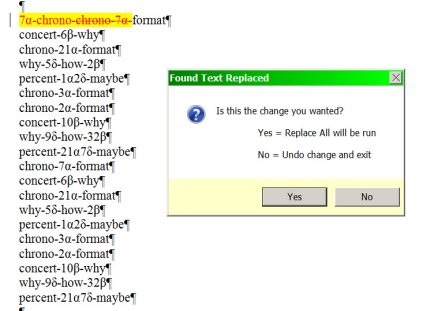
If you click yes, the macro will then do a WFR throughout your document and make the appropriate changes, as shown here: 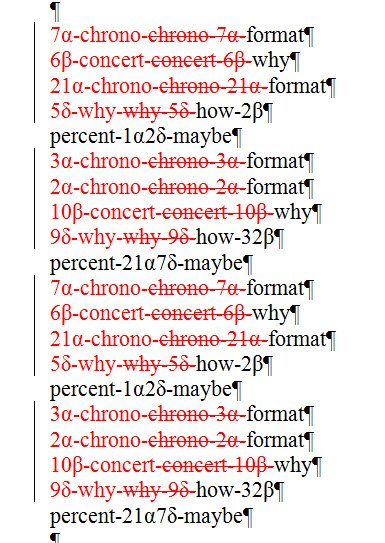
The main dialog window is still open so at this juncture you would click Close. 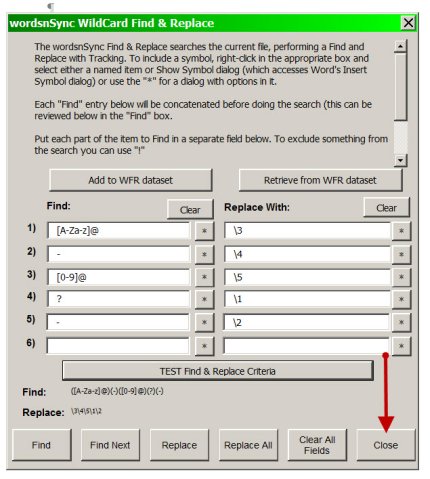
Clicking close brings up a dialog box that gives you three choices, as shown here: 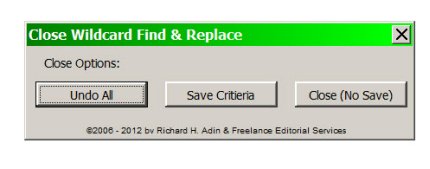
Choosing Undo All undoes all of the changes you just made to your document; choosing Close (No Save) ends the macro and you are not given a chance to save your WFR criteria. If you choose Save Criteria, the below dialog appears, giving you a chance to save your WFR criteria for a subsequent search. 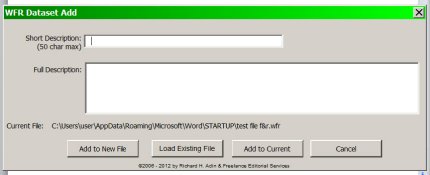
This dialog gives you several options for saving the criteria. Above the buttons it shows you the current WFR file to which you can add the criteria by clicking Add to Current. If you want to save the criteria to an already existing file but that is not the file shown above the buttons, choose Load Existing File. Click Add to New File if you want to create a new file. Cancel simply cancels this task. The dialog box gives you the opportunity to briefly describe what the WFR criteria do and to provide a more complete description, as shown here: 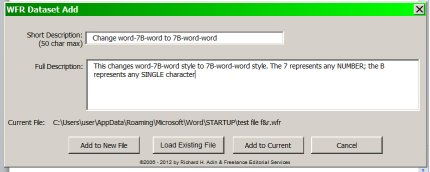
After entering the description, click the appropriate button. Doing so will raise this dialog box, confirming that the criteria have been saved: 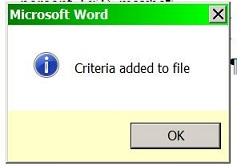
The next time you want to use criteria that you have previously saved, in the main dialog box click Retrieve from WFR Dataset. 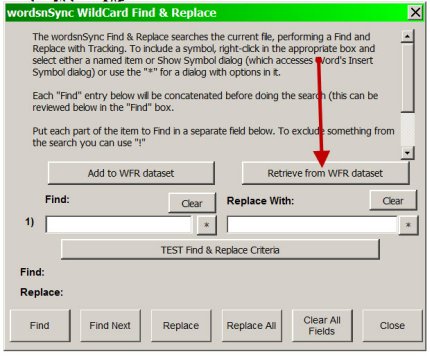
Clicking Retrieve from WFR Dataset opens the Dataset dialog box shown here: 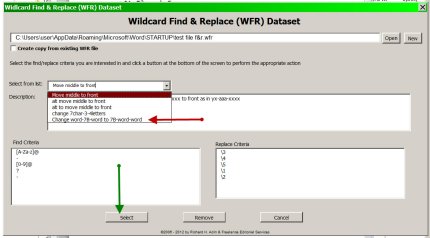
Note in the dropdown (red arrow) the criteria appears using the short description. Click on it and then click Select (green arrow). That will cause your selected WFR criteria to populate the Find and Replace With fields in the main dialog window as shown here: 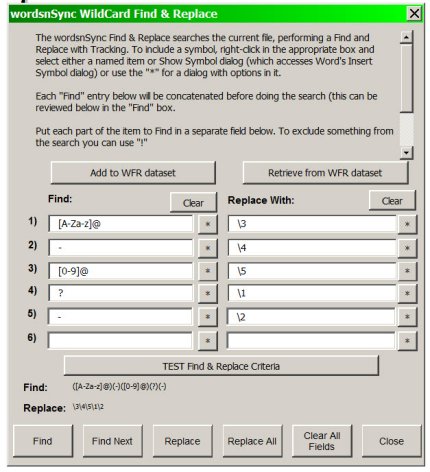
Now let's look at some of the other options in the WFR macro. If you click the Test button (assuming your Find and Replace With fields are populated) you will get the following dialog. This time, however, we'll choose No as our response: 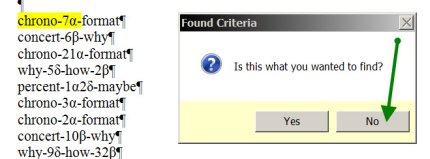
Choosing No cancels the test and the selected material is deselected and you are returned to the main dialog box so you can modify the criteria as needed. 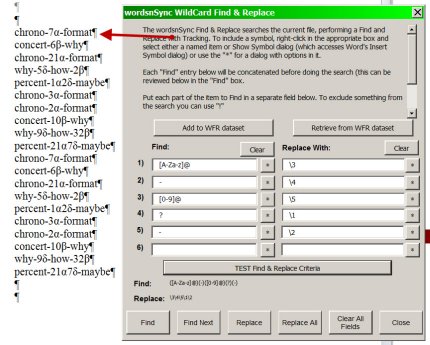
If you choose Cancel on the main dialog box, you get the three choices shown below. The two relevant options are to Save Criteria or Close (No Save). 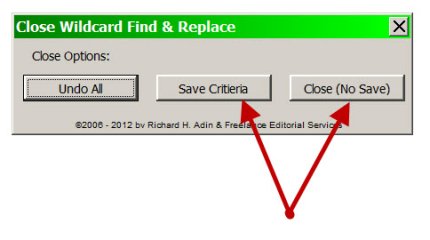
There are several ways to populate the fields. You can always manually enter criteria using your keyboard. Another way is to place your cursor in the field and right-click. That will bring up the following options: 
Another option is to click the asterisk (*) button (red arrow in the figure below), which will bring up the dialog with the options indicated by the green arrow in the following figure: 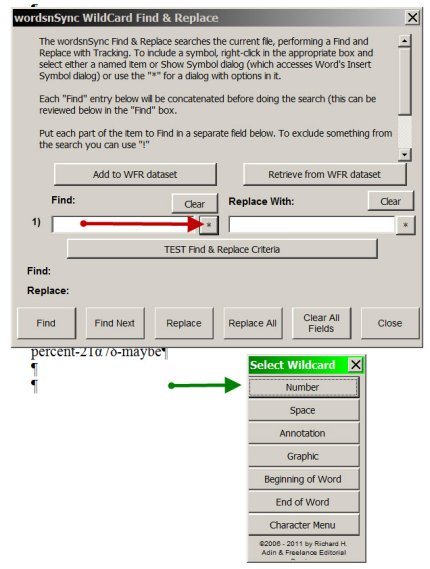
As an example, if you click Number from the menu, the Number dialog box will appear. The default is no limit to the numbers that can be found, but if you want, for example, a minimum of 3 numbers but no more than 5 numbers (i.e., 350, 4554, or 56789, but not 1 or 23 or 567890+) you would enter 3 in the minimum field and 5 in the maximum field. 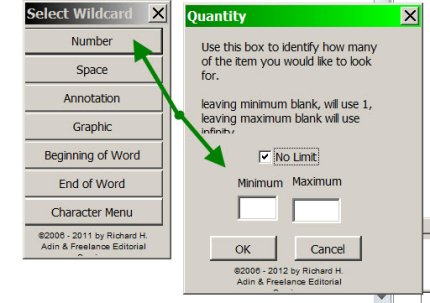
Assuming you left the fields blank and No Limit checked, clicking OK would enter the correct criterion in the first available field as shown here: 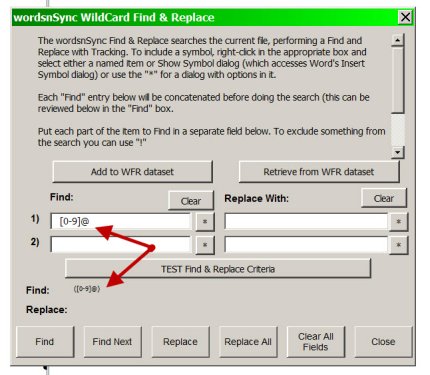
The Replace With fields offer the same options (manual entry; right click; asterisk button) but the options presented by the asterisk (*) button are different than those offered for the Find, as this figure shows: 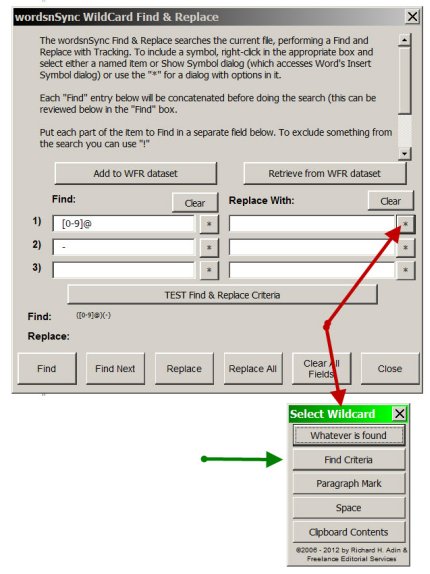
If you click Find Criteria from the menu, it brings up the Use Find Criteria dialog box which lists the entries found in each of the populated Find fields. Double-clicking on the criterion you want to populate the first available Replace With field selects it, as shown below. 
Click OK and that criterion is automatically placed in the first available Replace With field, as shown here: 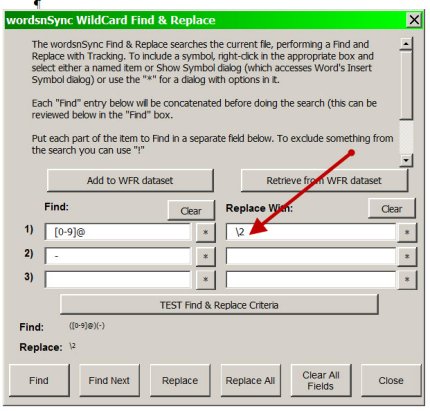
If what you want in that field is not found in the Find criteria, you either manually, right click, or select a different option from the menu to place the criterion. What About Symbols & Special Characters?Searching for and replacing with symbols and special characters — whether by themselves or as part of a word or phrase — is easy with WFR. Right click in the appropriate field (Find: or Replace With:) and you will see a menu as shown below. The last option is Show Symbol Dialog. 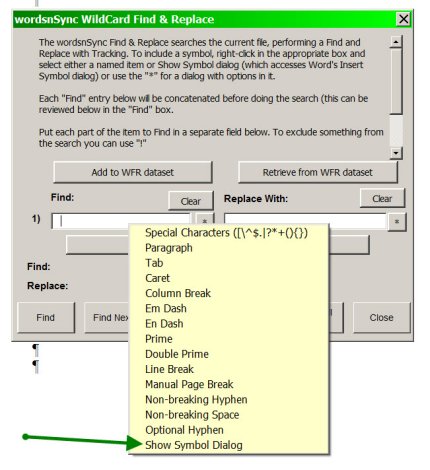
You can choose one of the symbols in Word's Symbol dialog. Double-click the symbol you want and it is placed in the appropriate field. Note that the menu lists some of the more commonly used symbols. What About Advanced Users?The most important features of WFR for advanced users are the capability to test the find and replace criteria and the ability to save and reuse wildcard searches, neither of which is available in Word. |
Read More
Purchase a license to use EditTools by clicking the link below |