Click List
IMPORTANT: Most of the tab names in the EditTools macros NSW, Toggle, Click List, and Insert Query can be
renamed to reflect your work and needs. For example, in NSW you can change the tab name Studies/Trials to
Secondary Characters or Location Names or to whatever is most appropriate. EditTools works with both fiction and
nonfiction editorial projects. Look for the Change Tab Name button.
Click List and Click List Manager have undergone extensive updating. Although Click List was very useful in earlier versions, it is now many times more useful for editors. We begin exploration of the changes for EditTools with the Click List Manager, which is shown here: 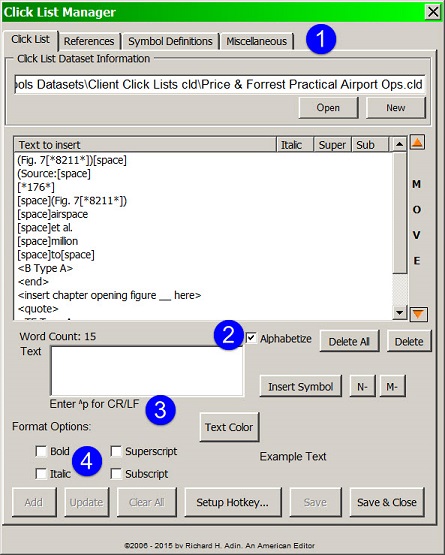
Three new tabs have been added to the Manager (and to Click List), namely References, Symbol Definitions, and Miscellaneous (#1). Each tab uses its own dataset, so you can have multiple datasets for one tab, and just a generic dataset for another, such as for Symbol Definitions. Also added to each tab is the ability to have the entries alphabetized (#2) by checking the Alphabetize box. Missing from the previous version of Click List was the ability to insert a paragraph return as part of a Click List entry. Now you can add ^p at the end of an entry (#3) on every tab except Symbol Definitions. The final addition to the Click List, References, and Miscellaneous tabs is the ability to make the entry bold, italic, subscript, and/or superscript (note: the format option applies to the whole entry only). Symbol Definitions TabShown below is the Symbol Definitions tab in the Click List Manager. 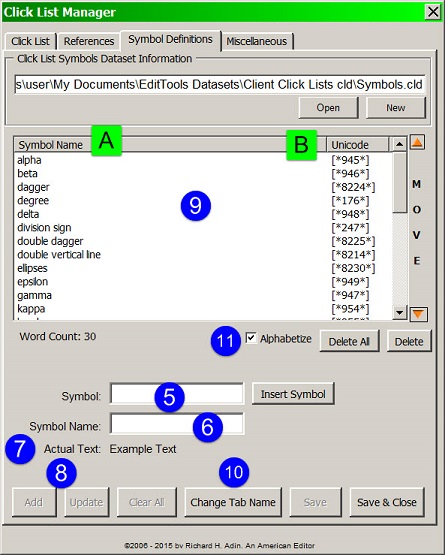
This tab shows one feature that is available on all tabs except the Click List tab: the ability to rename the tab (#10). Clicking Change Tab Name opens the Change Tab Name dialog shown here: 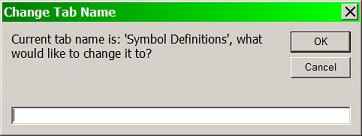
Enter the new name for the tab and click OK. The tab's name will change. The Symbol Definitions tab works differently than the Click List, References, and Miscellaneous tabs, and is designed specifically for quick insertion of symbol items found in Word's Symbol dialog. Unlike the other tabs, the Symbol Definitions is two columned: Symbol Name (#A) and the symbol's Unicode (#B). Without Symbol Definitions, you need to either already know the character code for the symbol you want to enter, or have assigned the symbol to either AutoCorrect or a Shortcut Key, or scroll through the options until you find the character you want. With Symbol Definitions, once you have added a symbol to the list (#9), you will find the symbol by the name you have assigned it (#A). You begin by inserting the symbol you want added to the list. Clicking Insert Symbol opens Word's Symbol dialog. You find the symbol you want to add and double-click it to insert it into the Symbol field (#5). Next, in the Symbol Name field (#6), enter whatever name you want to call the symbol. The symbol will appear in the Actual Text line (#7), but not the name you are calling the symbol. Click Add (#8) to add the symbol (#B) and the symbol name (#A) to the list (#9). If you want your list alphabetized, check the Alphabetize box (#11), just as on other tabs. When you click Save (or Save & Close), your Click List entries are updated, even if the Click List dialog is open. If you need to edit an entry, double-click its name in the Manager (#9), make your changes in the Symbol (#5) or Symbol Name (#6) field, and then click Update. When you click Save (or Save & Close), Click List will also be updated. The Click List tab for Symbols is shown here: 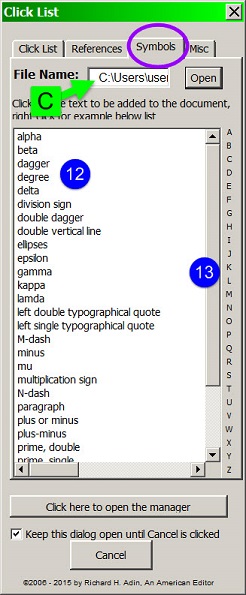
What you see in the list is the name you gave the symbol (#12). If you have a lot of entries and if you have alphabetized the list, you can use the alphabet index (#13) to quickly go to entries that begin with a particular letter. When you click on a name, the symbol associated with that name is inserted in your document. Click List is a handy way to store and access symbols for quick entry into a document. Also note, that like all other EditTools macros, the information is contained in a dataset (#C). You can use the default Symbols.cld or create your own — one or many. References TabThe References tab came about during editing of drug book when the author would cite the same book or chapter in a book several times, but never the same way twice. Each time the same editing had to be repeated, which was time-consuming. Click List provides a better method. The image below shows the References tab in both Click List and Click List Manager. 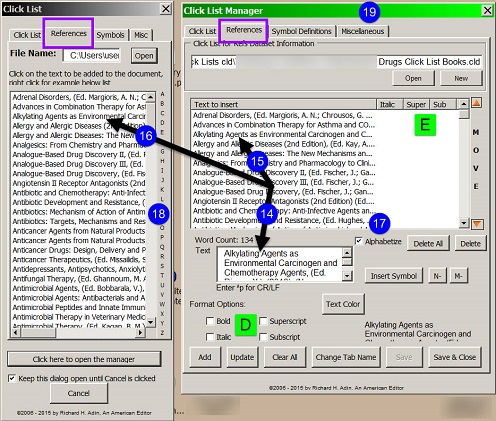
Once the reference was edited and formatted correctly, it was copied and pasted into the text box (#14) on the References tab of the Click List Manager. It was checked to make sure nothing stray tagged along, and Add was clicked to add it to the dataset (#15). If a formatting option had been applied (#D), an X would have appeared under the appropriate label (#E) in the Text to insert display (#15). When Save was clicked, the new entry appeared in the References tab of Click List (#16) in alphabetical order because the Alphabetize option was checked in the Manager (#17). Next time an entry appeared in a chapter reference list in this book, the entry could be selected if incorrect and then the correct form of the entry clicked on in the References tab of Click List to replace the incorrect entry with a correct entry. Instead of having to spend time reediting a reference, it could be done with a click. If the style used is a standard style, rather than a style peculiar to the project, you can create a master list that is usable for multiple projects in a particular genre. In other words, if the reference style is AMA 10 (American Medical Association 10th edition), you could create a dataset named, for example, AMA10 References.cld and next time you edit a book that follows the AMA 10 style, open this dataset and use it (and add to it) to correct incorrect citations. Note the alphabet (#18) down the right side of the Click List. Use that to navigate to entries that begin with a particular letter. If you need to edit an entry, double-click its name in the Text to insert field (#15), make your changes in the text field (14), and then click Update. When you click Save (or Save & Close), Click List will also be updated. The Original Click ListClick List is a complement to Toggle. Toggle replaces words or phrases the selecting a word or phrase that is already present in your document. It cannot insert something into a blank space; that is the job of Click List. Click List and its Manager are found on the EditTools tab (A). Like other, macros in EditTools, it can be assigned to a Hotkey combination either from the EditTools ribbon (B) or by Clicking Setup Hotkey… on the Click List Manager (see #1 below). 
Overviews of Click List (#10) and its Manager (#1) are shown in the below image: 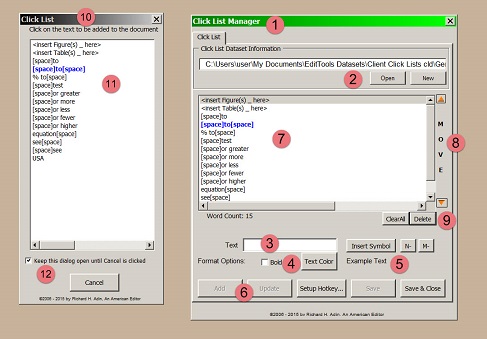
Like many of the macros in EditTools, Click List can be a general list that you use all of the time or it can be a specialty list, for example, one for a specific project. You open an existing Click List file or create a new one (#2) the same as with Never Spell Word, Toggle, and other EditTools macros. In fact, the Click List Manager works much the same way as the other Managers do, with a few exceptions. Text is entered in the Text field (#3). You can also enter into the Text field items from the Symbol dialog by clicking Insert Symbol. N and M dashes are inserted in the Text field by clicking the N- or M- button. However, in addition to the usual text insertions, you can choose to bold or color the text (#4) (for an example of text that is bold and colored, see #7 and #11). Your text and your format choices are shown in preview (#5). Note: The bolding and coloring are only for display in Click List so that there is a way to make certain items quicker to spot in a long list; the text is not inserted in your document with the formatting. When you are ready, click Add or Update (#6) to add the text to Click List (#7). Be sure to Save or Save & Close. (Clicking Save saves the file but does not close the Manager.) When you Save (or Save & Close), Click List (#10) is updated and your addition appears in the display area (#11). Click List remains open by default until you click Cancel (#12). However, you can have it automatically close after each use by dechecking the Keep open checkbox (#12). Click List enables you to insert items into your document with a single click. It can be a symbol, a word, a short phrase, or even a paragraph of text. It is intended to make it quicker to edit a document. You enter the text you want added to Click List in the Text box in the Click List Manager. In the example below, a sentence is being added (#13). When the text is ready to be added to Click List, click Add (#14). 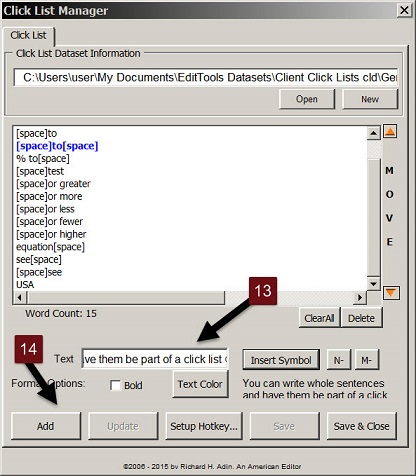
The text appears in the Manager's display field as shown below. Here a sentence was added, “You can write whole sentences and have them be part of a click list” (#15). However, to add the sentence to the Click List so that it can be inserted into your document, you need to click either Save or Save & Close (#16). Clicking Save saves the Click List file and makes the new text available in the Click List but also keeps the Manager open so you can add additional text later; clicking Close & Save does the same but closes the Manager. In addition, you can move text up or down the list using the Move buttons (#17); the Manager also tells you how many items there are in your Click List (#18). 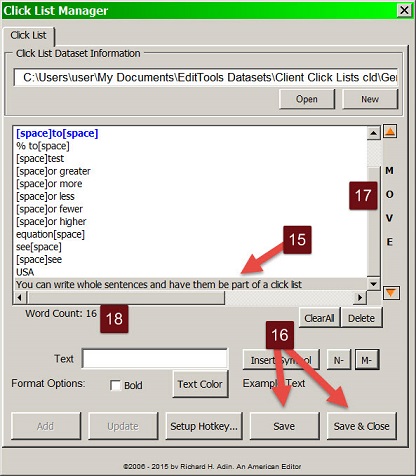
As this image shows, the sentence has been added to our Click List (blue arrow) and is ready for use in our documents: 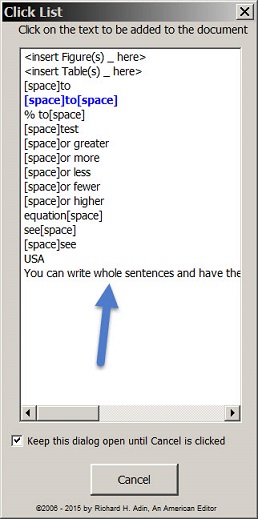
To see how Click List works, we begin with the below image which shows a portion of a manuscript. Note the location of the cursor. 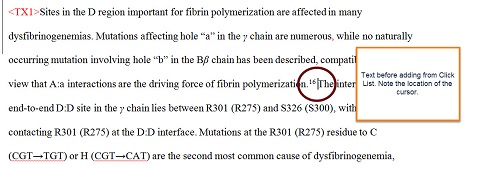
A single mouse click on the sentence we added to Click List (#19) inserts the sentence text into our document at the location of the cursor (#20). 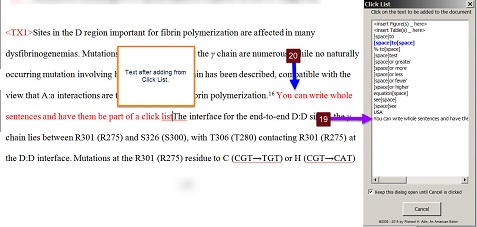
As indicated earlier, you can move text up and down the list in Click List by making use of the Move option in the Manager. You may wish to move text so that it is easier to locate or because it is more frequently used, the same reasons why you might use bold or color. The image below shows the movement process. To move our example sentence (#1) up or down, click on the appropriate arrowhead in Move (#2). When the sentence is relocated where you want, click Save or Save & Close (#3) so that the movement is saved to the Click List. Once Save is clicked, the relocation will be shown in the Click List (see #1 in both the Click List and the Manager). 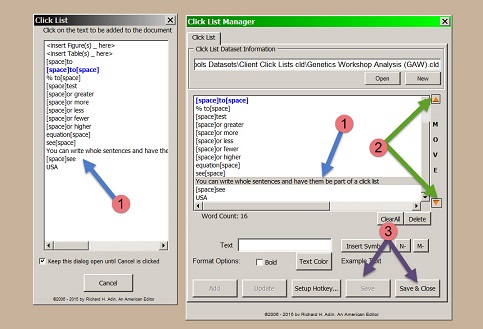
Click List can save time and can increase accuracy. It is a complement to Toggle, which replaces text. Click List inserts text. |
Read More
Purchase a license to use EditTools by clicking the link below |