Style InserterThe Style Inserter Manager has a couple of new options that make styling, and editing, easier. The new functions are the ability to style groups (#1), to include Word's default styles (#2), and to have a style also apply a language (#3). 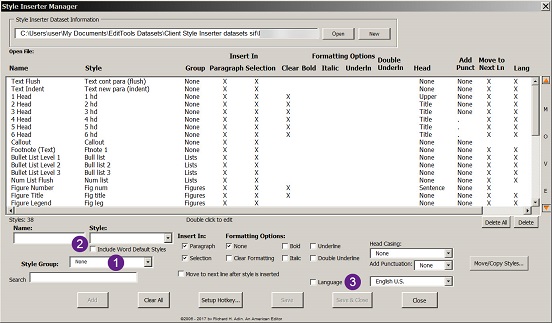
New to version 8 is the ability to organize styles by groups. To see groups that are available, click the down arrow (#4 below). The list of existing groups will be shown (#5). When a style has been assigned to a group, it is noted in the main field (#6). 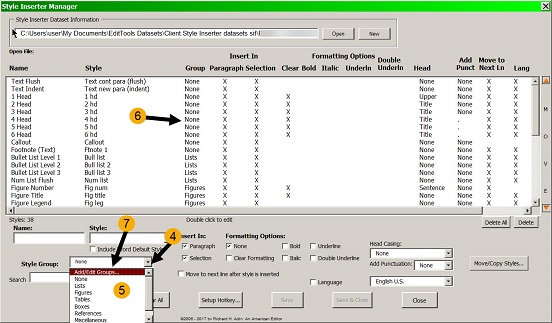
To create a new group or edit an existing group, click Add/Edit Groups (#7). It is likely you will need to scroll up to see this option. This is also where you organize the order of the groups. 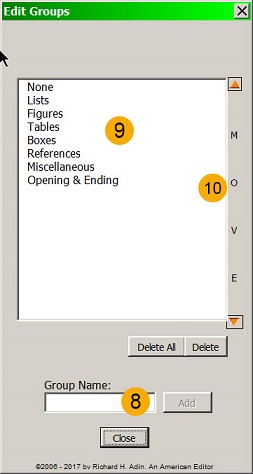
To create a new group, enter the name in the Group Name field (#8) and click Add. To change or edit an existing name, double-click on the name in the main field (#9). The name will appear in the Group Name field (#8). Edit it and click Update. To reorder the groups, select a group by clicking on its name (#9) and then use the Move feature (#10) to move the group up or down the list. To delete a group, select the group and click Delete. Grouping lets you organize styles and to place them in an order that is convenient for you when applying the styles. As the image below shows, when the Style Inserter macro (rather than the Manager) is run, the styles are grouped (#11) and ordered (#12) according to your preference. Note that the group name appears (#11) with the styles that are part of the group listed under the group name (#12). 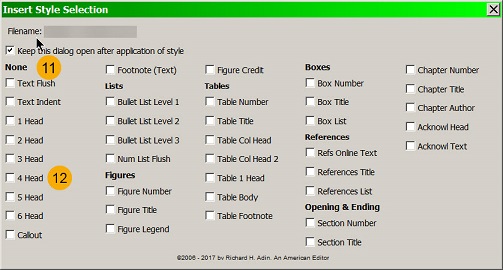
Compare the above to the previous method shown at the bottom of this web page (scroll down). Also new in this release is the ability to set the language for each style (#13 and #14). 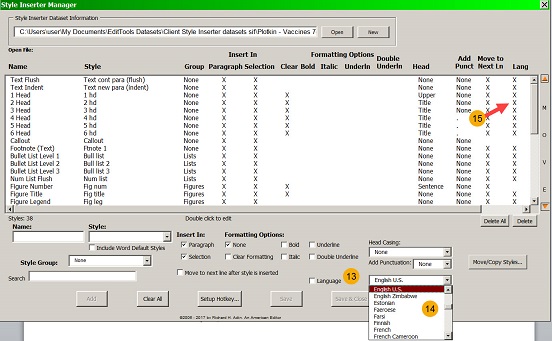
Select the language using the dropdown (#14). The list includes Word's list of available languages. The language you choose remains the default until you select another language. To include the instruction in a style, check the Language box (#13). If a language instruction is included in a style, it is denoted in the main field as an attribute of the style (#15). Additional OptionsThe Style Inserter Manager has new functionality. The image below shows the new Manager interface. The only change to the interface is the addition of Underline and Double Underline to the formatting options (#1 and #2): 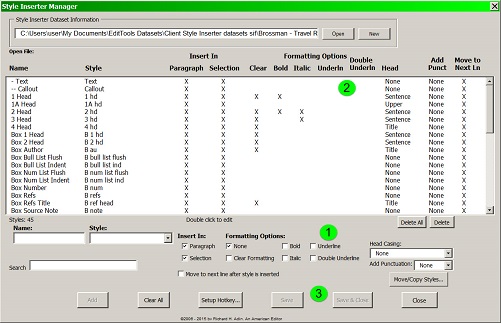
As with the original version, your choices are displayed in the main field (#2). One last improvement, but a very important one: In the original version of Style Inserter, if you made a change using the Manager — whether adding a new style or modifying an existing one — the change was reflected only in the Manager, not in Inserter if Inserter was open when the change was made in the Manager. To have Inserter reflect the change, Inserter had to be closed and reopened. In version 7, after making a change using the Manager, click either Save or Save & Close (#3) to have the change immediately appear in Inserter. This change lets you keep both Inserter and the Manager open as you style a document and also lets you make on-the-fly changes — adding new styles, modifying existing styles — and having them available and applied immediately. The Original Style InserterStyle Inserter is found on the EditTools Ribbon (#1) in the Inserters section (#2). It consists of 2 parts: a Manager (#3) and the macro (#4). 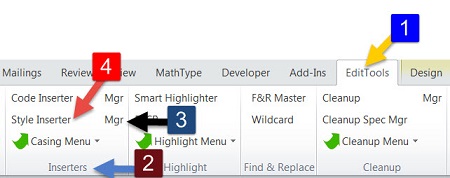
Clicking on Manager (#3 above) opens the dialog box shown below. Like most things with EditTools, you can save a style to a file so that it can be used again. What that means is that you have to either click the Open or New button (#5) to either open an existing saved style or create a new style dataset. 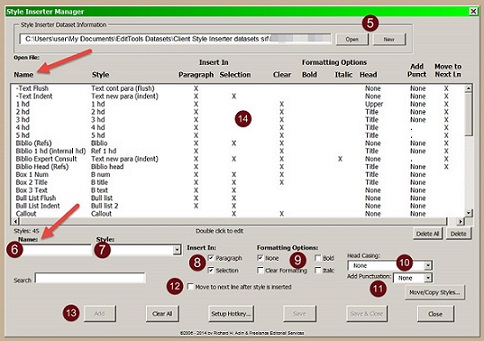
Note: There is one thing that needs to be noted when using the style manager. It works with a template. The template can be either one you have created or one that a client has provided. Regardless, whatever template you want to draw the styles to apply from must be attached to a document BEFORE you open the Style Manager. If you do not have open a document with the template attached, the Style Manager will not be able to identify the styles to be applied (#7). As the red arrows indicate, the column heads match the options below; for example, when you enter a name in the Name field (#6) it appears in the Name column. You begin the process by assigning a name to a style. Choosing the name lets you decide the order in which the styles will appear in the macro. The idea is to make it easy for you to find the styles. For example, with the shown style, I know that flush left text will be used frequently, so I have named the style so that it appears first. I entered the name in the Names field (#6). I then matched it to the true style using the drop down (#7) Style field. The Style field (#7) displays a list of all the styles in the template/document; you choose which one is to be associated with the name you created in the Name field (#6). Next you tell the macro whether the style is to be applied to a paragraph or to a selection (#8). As shown, it can be to either or both. What it means is that if your cursor is in a paragraph (anywhere) and the paragraph is checked, the style will be applied to the entire paragraph. Alternatively, if Selection is checked, it will be applied only to material you select, which can be, depending on the style, either a word or multiple paragraphs or anything between the two. The Formatting Options (#9) are self-explanatory except for Clear. If you check Clear, the macro will first clear any formatting from the paragraph or selection and then apply the style and your chosen options. Head Casing (#10) is also self-explanatory. You can have the style apply sentence case, title case, all lowercase, or all uppercase to the paragraph/selection. (See the Casing page for more information.) Some styles require ending punctuation. You can tell the macro to apply punctuation by selecting what you want applied from the dropdown menu (#11). Finally, by checking the Move to next line (#12), the macro will apply a style and move to the beginning of the next line so you can apply the next style. The value of this will become apparent when we talk of the macro, rather than the manager. Click Add (#13) to add your style to the Manager. In the main field (#14) you see all of your choices. Need to make a change? Double-click on an entry in the main field to edit it. After you have created and saved your Styles dataset, it is time to run the Style Inserter macro (#4 above). Running the macro brings up the Insert Style Selection dialog box shown here: 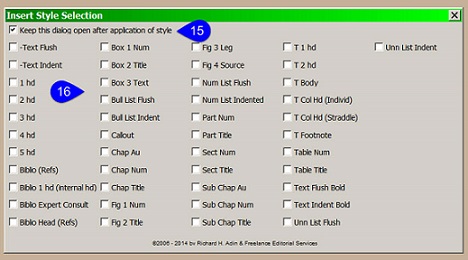
By default, the Keep this dialog open is checked (#15). By keeping it open, you can apply styles to a complete document without having to open and close the macro. If you decheck this option, after you apply a style, the dialog will close. You will need to reopen the dialog to apply the next style. If you compare the styles listed in this dialog (#16) with those shown in the Main Field (#14) of the Manager above, you will see that the macro automatically created this dialog based on the information in the manager and in the order shown in the manager. To apply a style, place your cursor in the paragraph or select the material and then click on the appropriate style name in this dialog (#16). The style will be applied as you created it. |
Read More
Purchase a license to use EditTools by clicking the link below |