The Insert Query Macro
IMPORTANT: Most of the tab names in the EditTools macros NSW, Toggle, Click List, and Insert Query can be
renamed to reflect your work and needs. For example, in NSW you can change the tab name Studies/Trials to
Secondary Characters or Location Names or to whatever is most appropriate. EditTools works with both fiction and
nonfiction editorial projects. Look for the Change Tab Name button.
The Insert Query macro is found on the Other menu. Although there has been just one update to Insert Query, it is a significant update: the ability to set the default tab; that is, the tab that should be active when Insert Query is open. In the original version of Insert Query (IQ), whatever was the last active tab was the active tab when IQ was next opened. If you preferred to have IQ open to a specific default tab, you could not set it. With IQ version 7 you can. 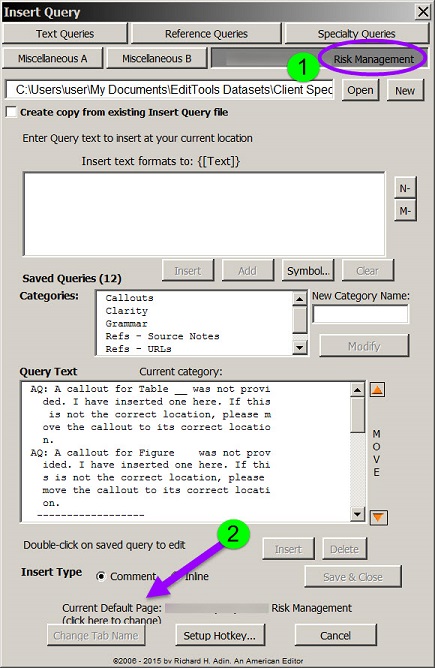
In the above image, the current default tab is the project-specific tab (#1 and #2). To change the default tab, click on the name of the current default tab at #2 — not on the tab (#1) itself — to open the Select Tab Name dialog shown here: 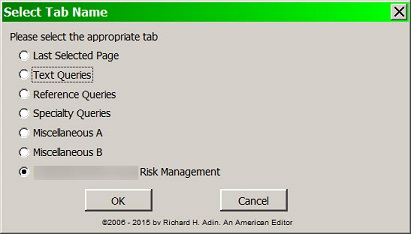
The Select Tab Name dialog lists all of the current tab names. To select a new default tab, click on the one you want and then click OK. Note that the very first option is to retain the last active tab (Last Selected Page). Your new default will be listed (#3) and it will remain the default until you change it, as shown here: 
One other point to note: The last option in the Select Tab Name dialog is the project-specific tab. When you select this option, it remains the default even when the name of the tab changes to reflect a new name drawn from a newly opened project-specific dataset. The name shown at #3 will simply reflect the new project dataset name. Update CategorizationInsert Query has made it easy for editors to create and reuse standardized comments. Unfortunately, as the number of standardized comments saved has grown, there has been no easy way to organize the comments so that it is easier and quicker to find the one you want. Insert Query (IQ) is accessed from either the EditTools ribbon (A) or a keyboard combination (hotkey) created using the Set Up Hotkey for Macro function found on the Hotkeys menu (C). 
A frequently made error by users of Word is to not select text before inserting a comment. They just click in the document and then insert the comment. The correct way is to select the text to which the comment should attach, as shown here: 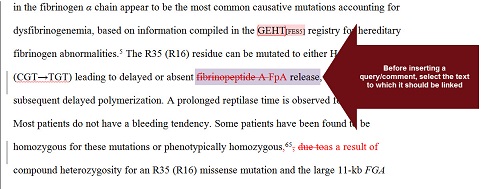
Selecting the text (a) makes it easier to identify that there is a comment to be addressed and (b) makes it clear what text is being commented on. To accommodate the new categorization feature, the IQ dialog has been modified, as shown here: 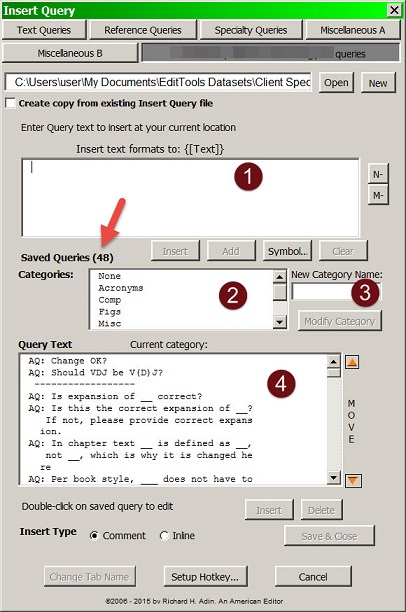
The basic options remain the same (if you are new to EditTools, be sure to scroll down to discover what the options not addressed in this section are and how to use them): Your comment text appears in the Insert Text field (#1), which is also where you type a new comment if not using an already-saved comment. If you are using a saved comment, clicking on it will display it in this Text field (#1). Note that in this example there are 48 already-saved comments just in this one tab (arrow). Each of the other tabs (Text Queries, Reference Queries, etc.) have saved comments, too; the number shown as Saved Queries reflects only those saved in the active tab. Previously, to choose from among the 48 comments you had to scroll down the list. The Move ability was generally used to move the most frequently used comments toward the top of the list and the least frequently used ones toward the end. The addition of categorization changes this. The categories you create are displayed in the Categories field (#2). If you decide that you want to change an existing category name, you do so with the New Category Name field (#3). When you assign a comment to a category, it appears in that category in the Query Text field (#4). The Move function now moves a comment up or down within a category, not the whole list. The dashed line seen in the Query Text field (#4) is a separator of categories. Categories appear alphabetically with the exception of the None category, which remains at the top in both the Categories (#2) and the Query Text (#4) fields. 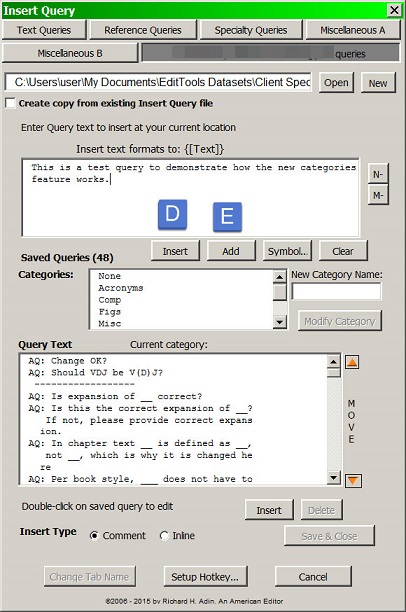
A new comment is created and inserted or saved the same as before. You type it in the Insert Text field (#1 above) as shown below. To just insert it without saving it, click Insert (D); to save it as a standard comment that can be recalled for future use, click Add (E). When you click Add (E above), the Select IQ Category dialog appears. If you have not previously created categories, you see the dialog shown here: 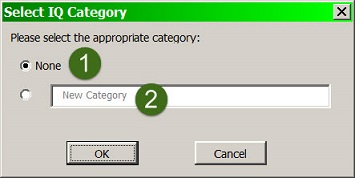
If you have already established some categories, the dialog will look more like this: 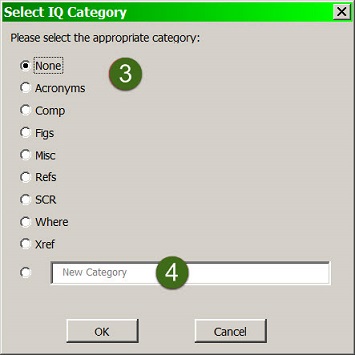
The default category is None (#1 and #3 above). If you have established categories you can choose to assign the new comment to an existing category by clicking on the category (#3) and clicking OK. Alternatively, you can create a new category by typing a name for the new category in the New Category field (#4 above; #5 below), and then clicking OK (#6). Note that the category name can be longer than a few characters (#5). 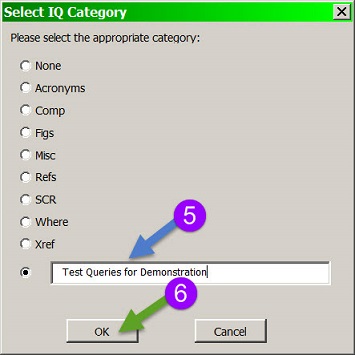
If you assigned a comment to a category and decide that you want to reassign it to a different category, double-click on the saved comment to open it for editing. Then, either without modifying the comment or after making changes to it, click Update. This will open the Select IQ Category dialog above and you can reassign the comment to a different category or create a new category. When you have added the new category and new comment, they will appear in the IQ dialog when you next open it, as shown below with our test comment: 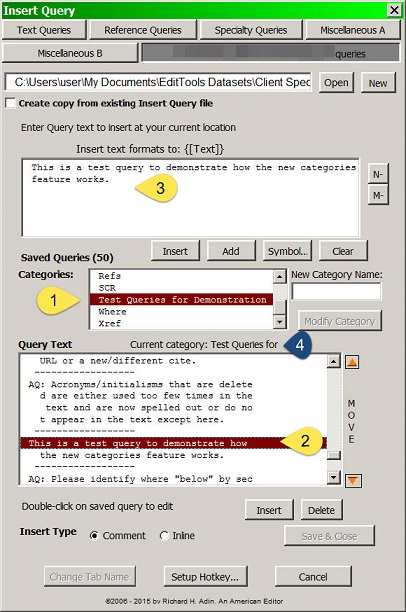
As shown, the new category appears in the Categories list (#1) and both the new category and the new comment appear in the list of comments in the Query Text field (#2). The new comment also appears in the Insert field (#3). When you click on a comment, you always know which category it belongs to by looking at the Current category line (#4). Clicking on a category in the Categories field (#1) only takes you to the first entry in the category; the Current category (#4) is useful when you are clicking on an other-than-the-first-in-the-category comment. The advantages of the categories are that it is quicker and easier to locate the comment I want to use. If the comment, for example, deals with cross-references, I can click on the category Xref (see #1) and be taken to the first comment that has been assigned to the Xref category (it will appear in the Query Text field (#2). If the first comment is not the correct one, I can scroll through the other comments in that category until I come to the correct one. If I need to try another category, I repeat the process. If I decide that a category name needs to be modified, perhaps to make it more descriptive or shorter, I can modify the name without losing the affiliation to the comments. I choose the category I want to rename by clicking on it (#5 below) and typing the new or modified name I want it to become in the New Category Name field (#6). I then click Modify Category (#7). 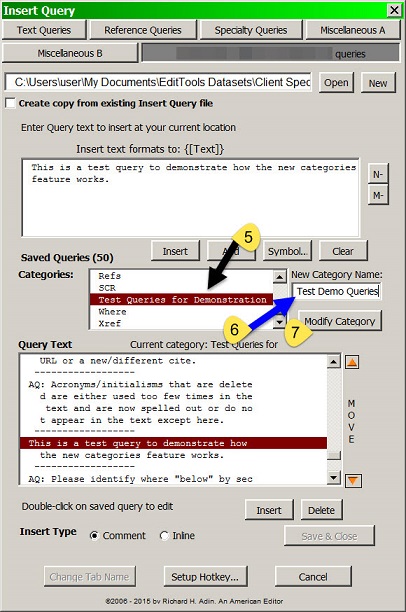
As shown below, the category name has changed (#8) but the comment that had been assigned to the original category remains assigned to the new/modified name (#9). 
If you do not want to use categories to organize your comments, simply select None, which is the default, when asked to select an IQ category. If all your comments are assigned to the same category, IQ will work as it has. Update M & N DashesInsert query only received a minor enhancement, the capability of inserting an N or M dash by clicking a button (#1). Previously, you had to open the Insert Symbol (#2) and search for the dash. 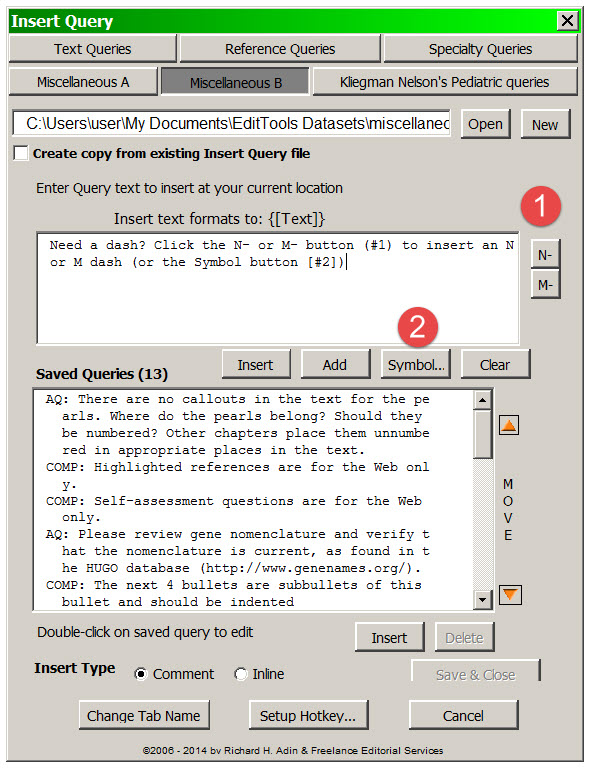
Update: The Project-Specific TabYou can now create a tab that includes queries that are specific to the particular project. You can copy queries from the other tabs to this tab, as well as create new queries that will not be saved to the more universal tabs. You create a file with the project name in it and then open it; the tab will automatically pickup the project name from the file name. Otherwise this tab works like the other tabs: 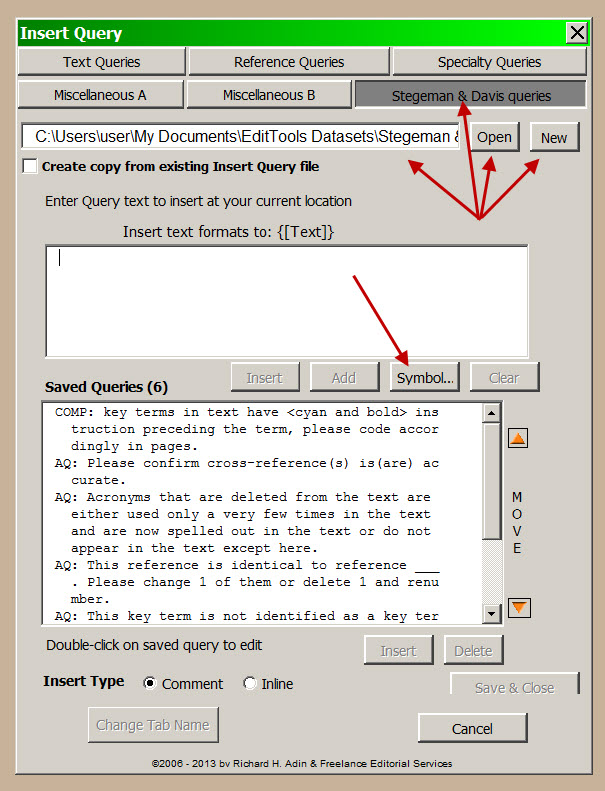
Note also the addition of the ability to insert symbols into your queries. Click the Symbol button to open Word's symbol dialog and insert a symbol into your query just as you would insert it into text. New in Insert Query in Version 4.0The basic functions of the original Insert Query macro described below have not changed. What has changed is the interface and the number of custom queries you can save. The new interface of the Insert Query macro appears as shown here. 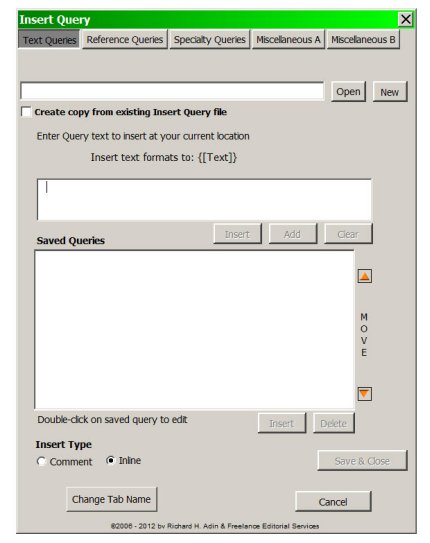
Using the tabs, you can group queries (remember that you can change the tab names by clicking the Change Tab Name button). In addition, you can save queries to files so, for example, if one client wants queries to begin AU: and another wants Q:, you can save queries to appropriate files and open them as needed. You can reorder your queries, making it easier to have the queries you are using most frequently for a particular project at the top of the page. Click the up arrowhead to move a selected query up the list, and the down arrowhead to move it down the list. Unlike earlier versions of Insert Query that limited the number of custom queries you could save, this upgrade enables you to save an unlimited number of custom queries. If you don't have a premade query appropriate for the occasion, just enter the text in the empty field box. Clicking Insert adds the query to your document; clicking Add adds the query to your stored list; and clicking Clear removes the typed text from the field. Features of the Insert Query MacroThe query can be inserted either inline or as a Word comment, as shown below (see arrow). Whichever you choose - inline or comment - remains the choice until you change it. Thus if your current project wants inline queries, you choose inline once; if the next project wants comment queries, you choose comment once. 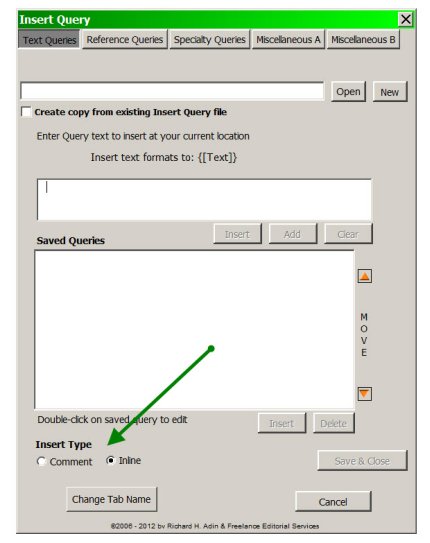
Do you find that you have certain queries you use repeatedly? Insert Query macro makes repetitive macros easy. Enter the text of the query in the text box and click Add and when done adding new queries to the file, click Save & Close. 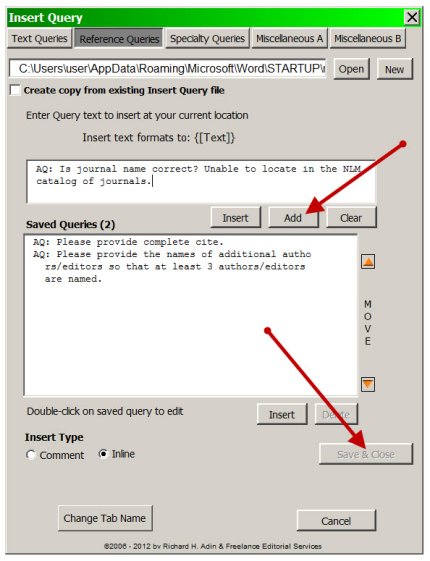
Next time you need this pattern query, you can find it in the list of saved queries. Just select it (red arrow below) and click Insert (blue arrow below) — no need to retype. No longer need a saved query? Select it and click Delete (orange arrow below) to remove it from the saved list. You can save an unlimited number of pattern queries; the number you have already saved is displayed on the dialog box (green arrow below). The saved queries work with both inline and comment queries. 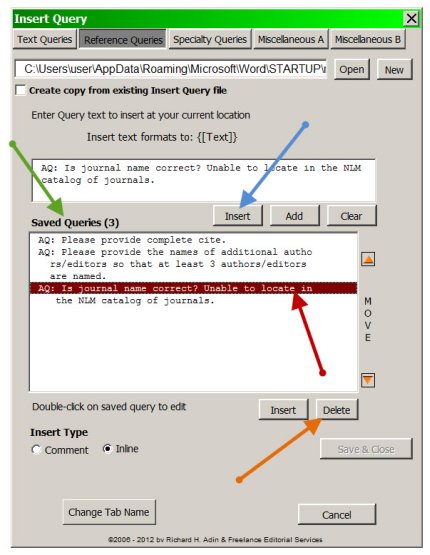
Finding an inline query is easy. The inline queries are enveloped between {[ and ]} and are bolded. In addition, the inline queries can also be automatically highlighted when you are done working on a document by running Highlight Inline Queries. Queries entered as comments are entered the same as if you used Word's Comment feature directly. 
|
Read More
Purchase a license to use EditTools by clicking the link below |