Open Dialog Manager (ODM)EditTools works best when the dialogs you use often are open and quickly accessible. With one or two open dialogs, accessing the open dialogs is not much of a problem, but when the number increases, access becomes more difficult. Having a large number of open dialogs can take up a lot screen real estate, blocking access to other tools. Here the dialogs take up most of a 24-inch widescreen monitor's real estate (these are the common dialogs that many EditTools users have open while editing). 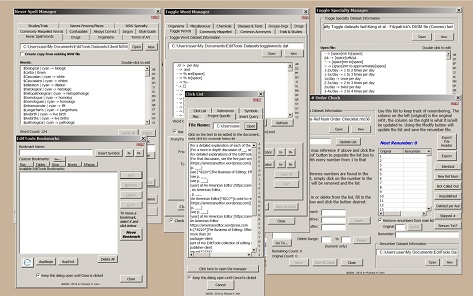
Or, if they stack one on top of the other, accessing the dialog you want quickly can be difficult as the stack order keeps changing. For example, this image represents the initial, manual stacking of the above dialogs. 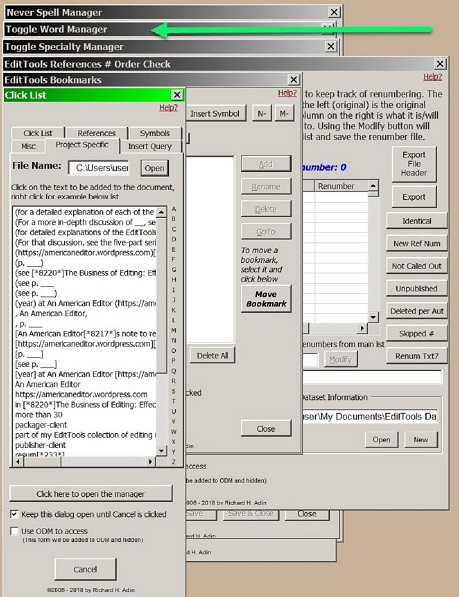
Even though less screen real estate is used and it appears that accessing the dialogs is easier, the easy access disappears once you begin accessing the dialogs, as shown below. In this image, the Toggle Word Manager dialog is accessed (see arrow in image above). Note how the Toggle dialog now obscures all of the dialog titles except Never Spell Manager. 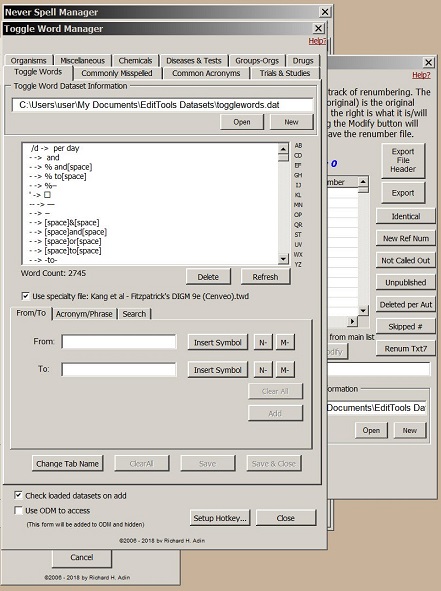
In addition to the open dialogs that need to be accessed, it is not unusual to have more than one open Word document that the editor needs to access. ODM — the Open Dialog Manager — is designed to make access to the open dialogs and documents quicker and easier. Setting Up ODMAccess to ODM is controlled through the ODM Settings, which is found on the EditTools Ribbon on the Misc menu at Other > ODM Settings as shown here (but see "Troubleshooting" below): 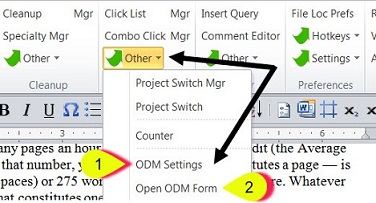
ODM has two "options": ODM Settings (#1) for automatic running of ODM and Open ODM Form (#2; but see "Troubleshooting" below) to manually run ODM. Clicking ODM Settings (#1) opens the Settings Manager shown here: 
There are four options, which are described below. You can select any one or more of the options, including all of the options. ODM will open only in accord with the chosen options. In the above image, ODM will open with Combo Click or by going to the MISC menu, clicking Other and then Open ODM Form; it will not open automatically when Word opens or via a hotkey combination.
Make your choice(s) and click OK. There is another method for accessing ODM. It is used when you find that you have opened more dialogs than you had originally thought you would and the open dialogs are taking up more screen real estate than you would like. For a discussion of this situation and method, see "One More ODM Trick" below. Overview of ODMThis is the ODM that appears when ODM is run. Its size depends on the number of dialogs and documents that are open. The image below shows all of the open dialogs that are displayed at the beginning of this Help document. 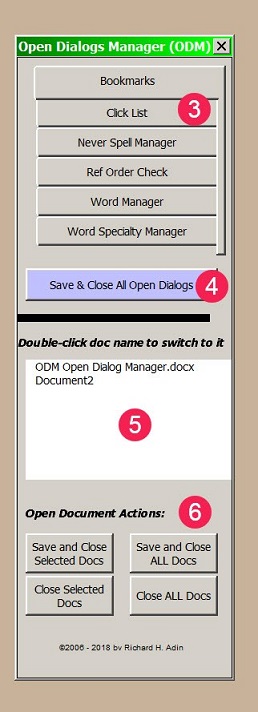
ODM lists the open dialogs in alphabetical order (#3, above). If you close a dialog, it will no longer be listed; if you open another dialog, it will be added to the list in alphabetical order. Clicking Save & Close All Open Dialogs (#4) will save and then close each of the open dialogs; it will not affect any open Word documents, just the EditTools dialogs. The field below the list of open dialogs (#5 in the above image) is where all currently open Word documents are listed. In this example there are two: Document2 and ODM Open Dialog Manager.docx. To switch to another document, double-click on its name. The final part of ODM is the document options (#6). These options only affect those documents listed in the document field (#5) — they do not affect the EditTools open dialogs. There are four self-explanatory options. For the left two options (the Selected Documents options), you need to select the files. To select a single document, single click on its name. To select a document, single click on its name. To select multiple documents, but not all open documents, single click on each document's name. To deselect a document, click on the document's name. If you want the action to affect all of the open documents (the right two ALL options), you only need to click the appropriate button; you do not need to select the files. Introducing ODMThe image below shows ODM next to the open stacked dialogs. 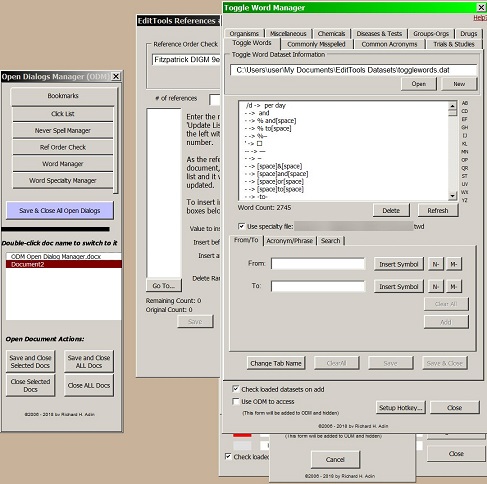
Note in the above image that the open dialogs are stacked in a different order than they are listed on ODM. For example, the first entry on ODM is Bookmarks but the topmost dialog in the stack is Toggle Word Manager. Managing the Stack I — The First MethodODM provides several ways to manage the stack. The first is the "Use ODM to Access" checkbox shown in the image below (arrow). Using this checkbox makes the initial stack of dialogs disappear immediately rather than having the stack be visible until the first time you click on a dialog name (see Managing the Stack II — The Second Method below). 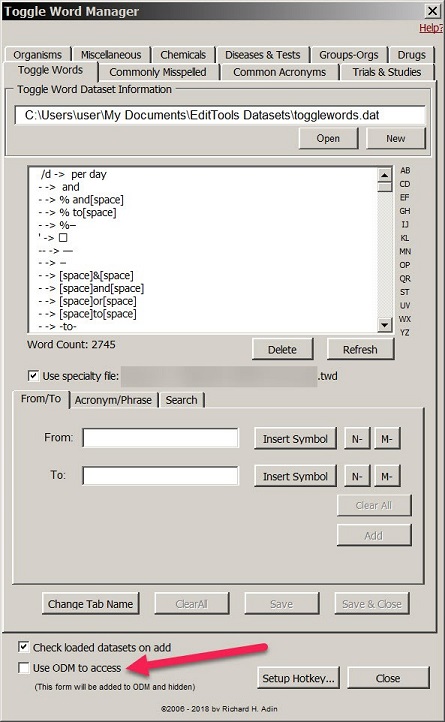
If you click on the checkbox, the dialog will "disappear" and remain so until you click on the dialog's name in ODM to make the dialog visible. When you are done with the dialog, click on its name in ODM and the dialog will again disappear. Using this method makes accessing the dialogs easy and minimizes the amount of screen real estate used by open dialogs.
Managing the Stack II — The Second MethodThe second method of using ODM to manage the open dialogs is to leave the dialogs stacked and visible and not check the checkbox. Instead, the first time you click on a dialog name in ODM to access one of the dialogs in the stack, all the open dialogs will "disappear". To see that first dialog, click the dialog's name a second time. That dialog will remain visible until you either click another name in the ODM, at which time the first dialog will be replaced with the new dialog, which new dialog will remain visible until a new name is clicked, or you click the dialog's name again, at which time it will "disappear" (see Managing the Stack III — The Third Method below).
Managing the Stack III — The Third MethodThere is a third way to deal with visible dialogs. To make the NSW dialog in the above image disappear, just click on Never Spell Word in ODM. ODM will remain visible but NSW will disappear. Using the Use ODM to Access checkbox hides the initial stack — you do not need to wait until you are ready to use the first dialog to free up screen space. 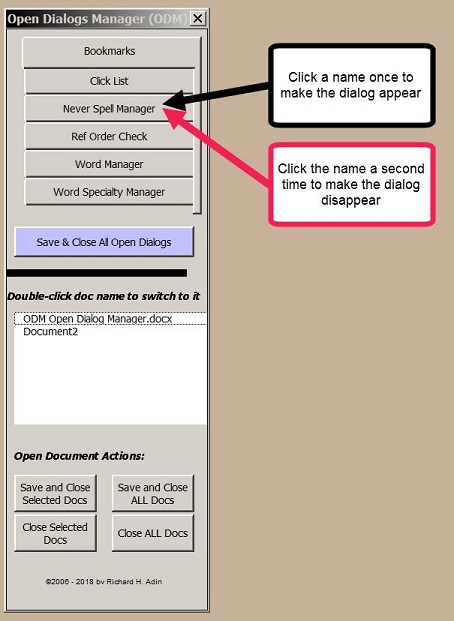
One More ODM TrickSometimes you start a project and think you only need one or two dialogs open during editing, so you open them by clicking on them in the EditTools Ribbon. These dialogs are open and accessible without using ODM because ODM doesn't seem to be needed and your screen looks something like this: 
As editing progresses, you find that it would be helpful to open another dialog or two and to keep them open. Now you have created a screen real estate problem, but do not have ODM running. 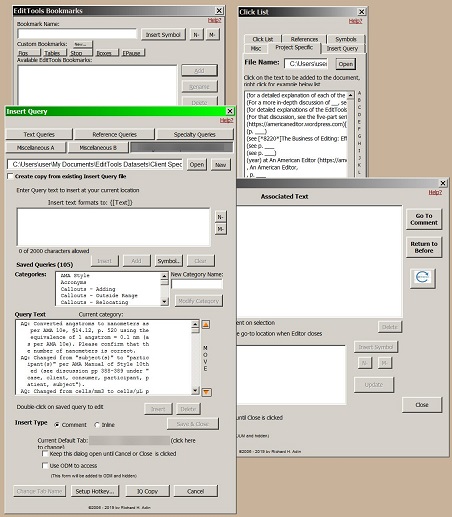
Alternatively, from habit you manually open the three or four dialogs you want accessible while editing, creating a screen real estate problem, but without having thought about opening ODM. What you have is something like what is shown in the above image — several open dialogs spread out and taking up valuable screen real estate or a stack of open dialogs as shown in earlier images. The solution is to check the Use ODM to Access checkbox on one of the dialogs. 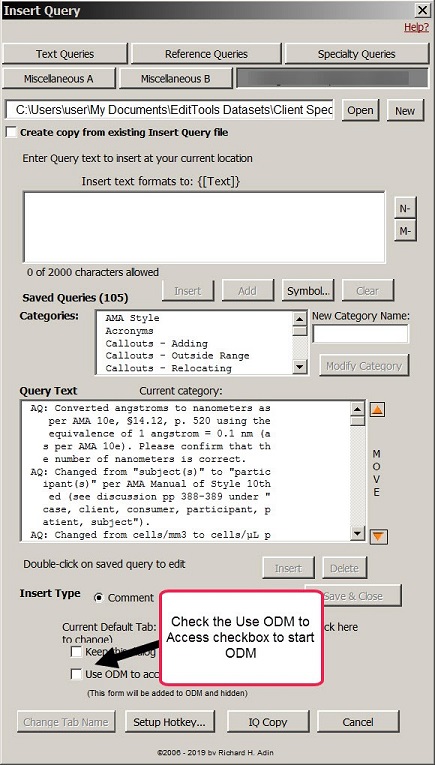
Checking that box will cause ODM to open and populate with all of the open dialogs as shown below. It is a quick way to switch from no ODM to ODM. 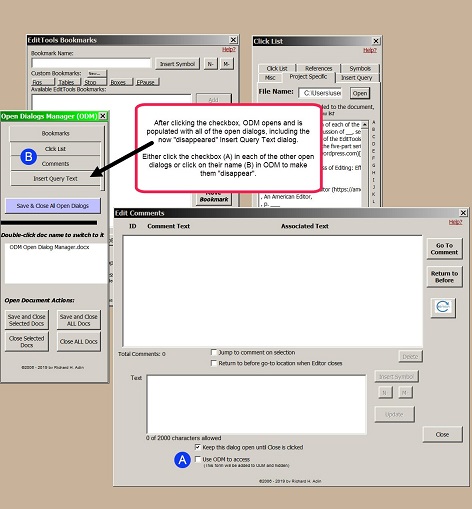
Now you can either check the checkbox in each of the visible dialogs or click on a dialog's name in ODM to make the remaining open dialogs "disappear" and make screen real estate available. Using ODM to Access the DialogsIf you are editing a document and come across a word you want to add to one of the Never Spell Manager (NSW) tabs, you would have difficulty accessing the Never Spell Manager dialog directly in the stack unless the NSW dialog is already at the front of the stack. The solutions is to click Never Spell Manager in ODM (#7) to bring the Never Spell Manager to the front of the stack (#8) (or, if the dialogs are not visible, to make the NSW Manager visible). 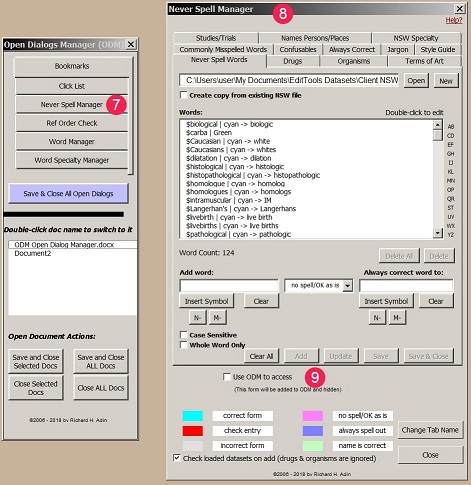
Note that the Use ODM to Access checkbox is not checked (#9). This means that the NSW dialog will remain visible until either another dialog name is clicked, at which time it will disappear and the new dialog will become visible, or its name is clicked again (see Managing the Stack III — The Third Method above). When Open Dialogs Are No Longer NeededWhen you no longer need to access any of the open dialogs, click the Save & Close All Open Dialogs button (#4, above) to close all of the open dialogs and save any pending changes. That will also close ODM, but leave all Word documents open.
|
Read More
Purchase a license to use EditTools by clicking the link below |