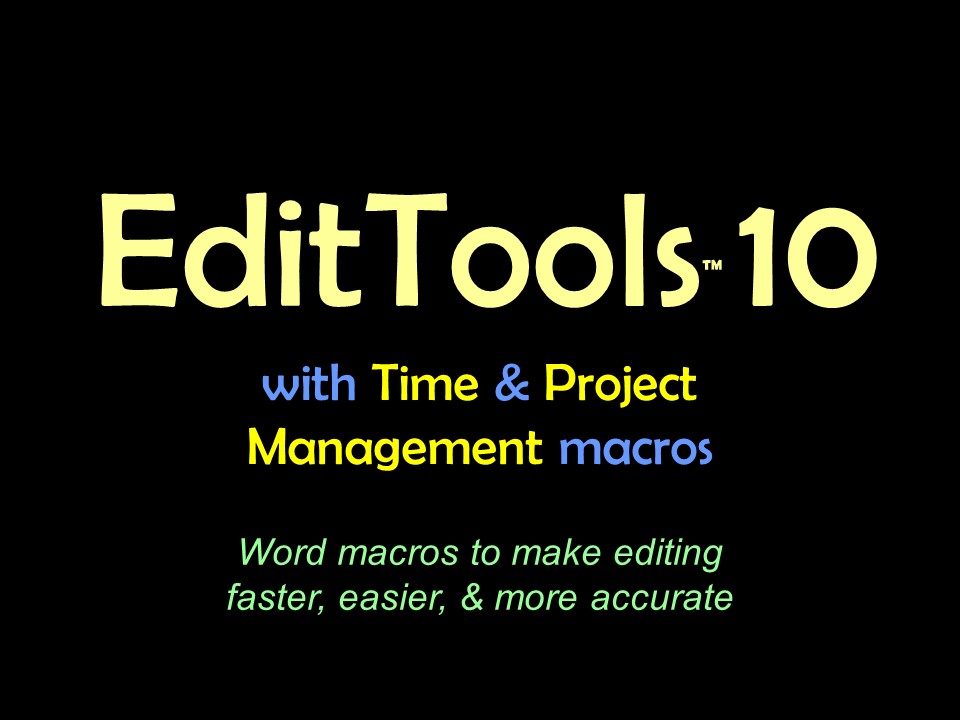
JournalsThe Enhanced Journals ManagerThe enhanced Journal Manager speeds up entering items into the Journals dataset and enable you to update multiple journal datasets simultaneously. When you first open the Journals Manager, you see the familiar Manager dialog shown below. However, there is a subtle but significant change to the dialog — you can choose to switch to a wholly new interface. Just enter a checkmark in the Switch to enhanced Journals screen box (#1). 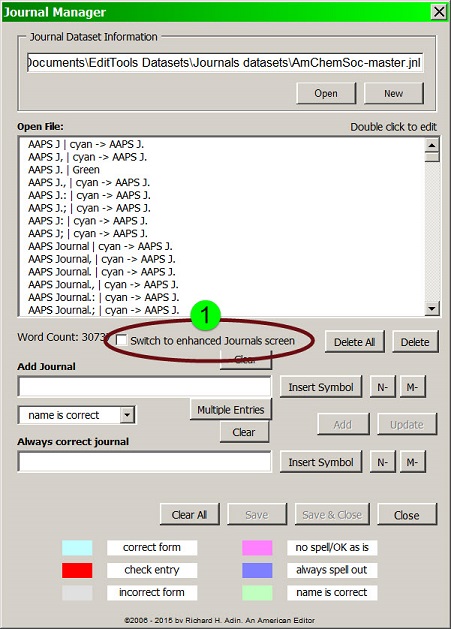
When you choose this option (it will become the default when chosen), you are immediately switched to the new, enhanced dialog shown here: 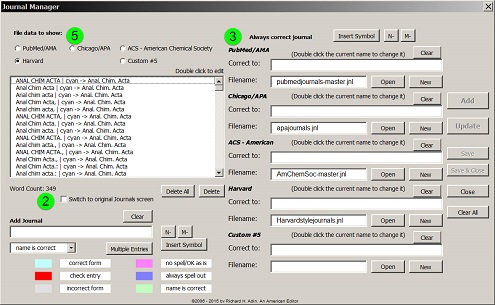
You can switch back to the original dialog interface by checking the Switch box (#2), and the original will become the default again. The enhanced dialog has some new, significant, time-saving features. First, note that it allows you to add data to as many as 5 datasets simultaneously. You can see in the above image, that 4 are currently being updated. The first dataset, PubMed/AMA in the image (#3), was originally named Custom #1. The name was changed by double-clicking on the name (Custom #1 or now PubMed/AMA), which brings up the renaming dialog shown here: 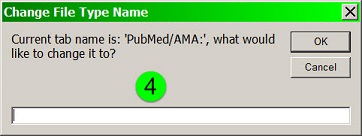
Enter the name you want the field called (#4) and click OK. The field will be renamed as will the name in the File Data to Show area (#5 in the image below). Here you can select which dataset's entries you want to view. In this example, it is showing the Harvard dataset. 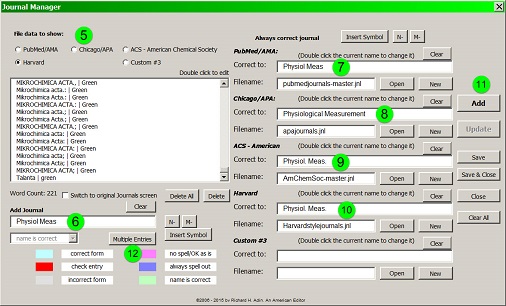
This dialog can be used to enter a single title option, just as the original dialog. In this example, the journal name to enter is Physiol Meas (#6). That form is fine for PubMed/AMA (#7), but not for the other datasets. So, in the fields for the other datasets, the correct forms are entered (#8 to #10). Then, by clicking Add (#11), all of the datasets are updated simultaneously. Using the original dialog (and in versions of EditTools 6.2 and older), each dataset would have to be updated separately, which means reentering all of the journal name variations for each dataset. As you can see, it is not necessary to make use of all of the dataset fields. You can use one, five, or any number between. Only those in which the Correct to field has an entry will be updated. In other words, if only the PubMed/AMA dataset was to be updated with the information in #6 and #7, then #8 through #10 would be left empty. Clicking Add (#11) would update only the PubMed/AMA dataset. Multiple EntriesThe Multiple Entries option still exists — but now it works for both the original and the enhanced dialogs. And Multiple Entries has some new features, many of which can be preset. All of this takes place in the Multiple Entries dialog (shown below), which is opened by clicking the Multiple Entries button in either the Enhanced (#12) or Original Journal Manager. 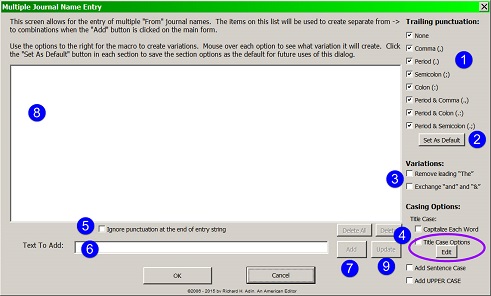
The list of trailing punctuation options (#1) can be individually set each time you make an entry or can be preselected (some or all) and established as the default (#2). What this option does is add trailing punctuation to the end of the text you enter in the Text to Add (#6) field. For example, if you enter in #6: The New England Journal of Medicine without any trailing punctuation and have selected all of the options as shown (#1), the following variations will be entered in the primary field (#8) and ultimately become part of the dataset: The New England Journal of Medicine
However, if you enter in #6 the title with trailing punctuation, for example, a period, then the punctuation will be added following that period and you will have entries with a double period. The same entries would look like this: The New England Journal of Medicine.
The easiest way to avoid this double-punctuation result is to click Ignore punctuation at the end of entry string (#5). When checked, it becomes the default until unchecked, at which time the unchecked becomes the default. If you enter: The New England Journal of Medicine you will get the results shown here: The New England Journal of Medicine
If you enter: The New England Journal of Medicine. and the Ignore option is checked, you will get the same results as above, that is, the same as if you had entered The New England Journal of Medicine The Variations option provides two choices. The first removes "The" from the beginning of the text name. That means that in addition to the entries above, you would also get the same entries added but without the leading "The"; that is: The New England Journal of Medicine
The second variation automatically swaps "and" and "&". Again, that means that if "and" appears in the title, you will have entries with both "and" and "&" created. Also available are casing options (#4). Clicking Edit under Title Case Options opens a special dialog, shown below, in which you can instruct the macro to always keep certain words as lowercase unless they are the first word of the title. 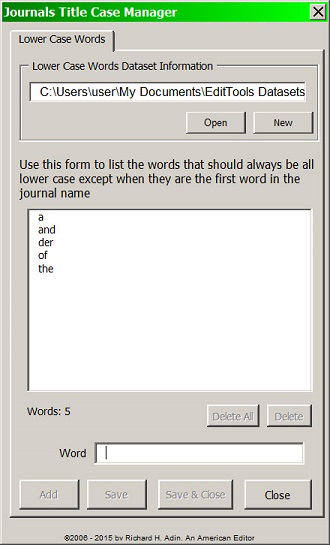
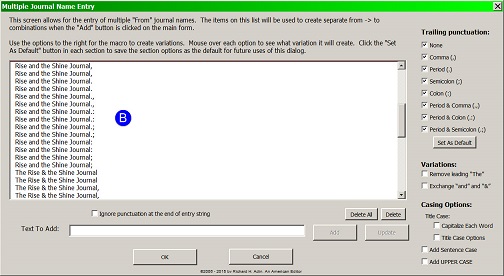
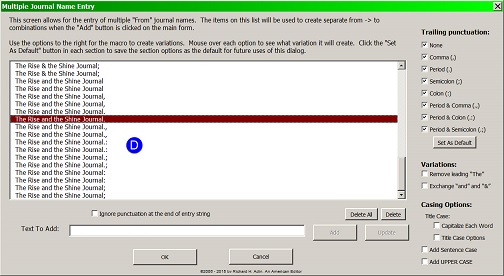
If you are copying and pasting the text for the Text To Add (#6) field, and that text has trailing punctuation, you can tell the macro to ignore it by checking the box at #5 (see above for a more detailed explanation). Clicking Add (#7) adds the text with the options to the main field (#8). If an entry is not done correctly, you can double-click it in #8, edit it in #6, then click Update (#9) to fix the entry. Here is an example of how the macro can work. The image below shows the entry "The Rise and the Shine Journal" (#10) as the journal whose name we want to add to our dataset. The Title Case Options (#11) has been selected as have both Variations (#12) and all of the punctuation options (#13). Clicking Add (#14) will automatically add the title and the variations to the main field (#15). 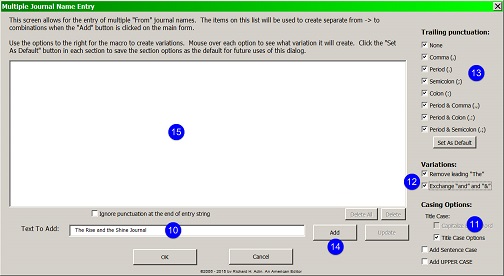
The results are shown in the following four images. Each of the entries shown in the below four images was added by the macro with the single press of Add (#14). 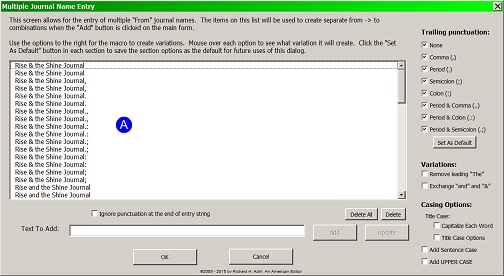

Although you may not need or want all of these options, whatever options you do want can be quickly created, whereas with earlier versions of the Journals Manager, each option would have to have been added one at a time, a time-consuming process. The Enhanced Journal Manager's ability to add data to up to five separate datasets and the options provided in the new Multiple Entries are significant improvements that greatly increase efficiency for those editors who work with different reference styles. Autosearching && Multiple EntriesBeging autosearching by typing in the "Add word" field (#1) and the macro goes to the first entry in the dataset list that matches what you have typed (#2). It is a quick way to determine whether an item is already in the dataset or to check spelling. Pressing the Clear button (#3) removes whatever you have typed from the field. And if an entry requires an N or M dash, it is easy to add (#4). If you want to enter several variations of a journal name, it is much easier than previously — click the Multiple Entries button (#5). 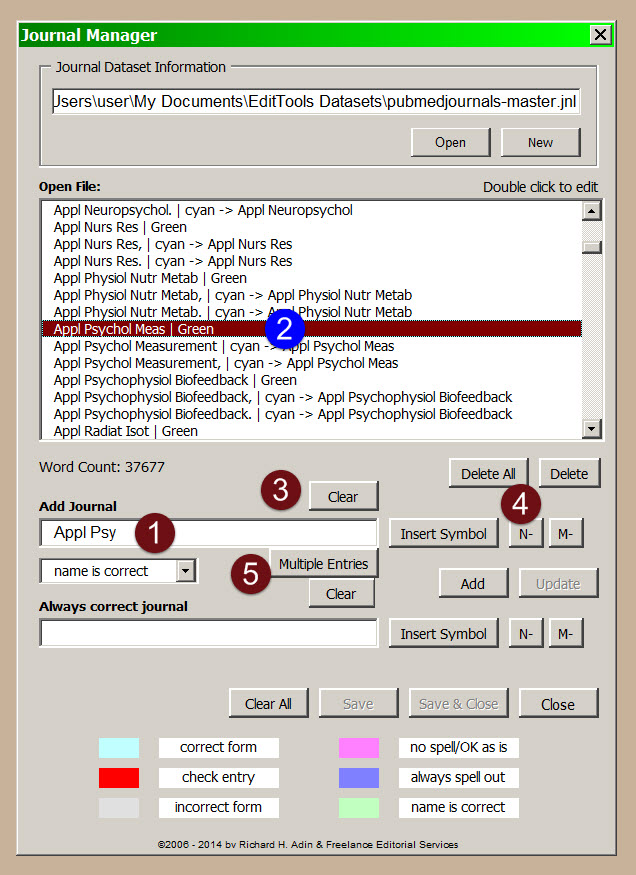
Clicking the Multiple Entries button brings up the Multiple Journal Name Entry box (#6) shown below. Enter the journal names in the Text To Add field (#7) and click Add (#8). The text will appear in the main field (#9). Continue adding variations and when done, click OK (#10). NOTE: You cannot add names of multiple journals (e.g., New England Journal of Medicine, Archives of Medicine, and Pediatrics) this way. The variations must relate to the same journal (as shown in #9) because these are the incorrect variations and in the next step, you will indicate the name to which all of these are to be converted. 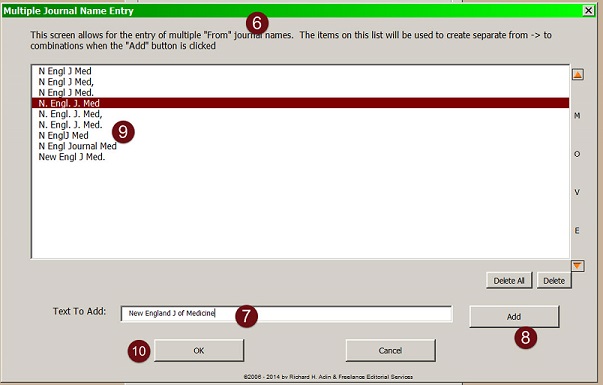
After clicking OK in the Multiple Entries box, you will return to the main Journals Manager screen. You will see the text "Use 'Multiple Entries' button to adjust" in the Add Journal field (#11). That text indicates you have used the Multiple Entries box and if you want to add more variations or delete some, you need to click the Multiple Entries button again. In the Always correct journal field (#12), enter the name you want all of the Multiple Entries items to be changed to. Then click Add (#13) to add all of the items to your dataset. If you change your mind and decide not to add any of the variations, click Clear All (#14) instead of Add. 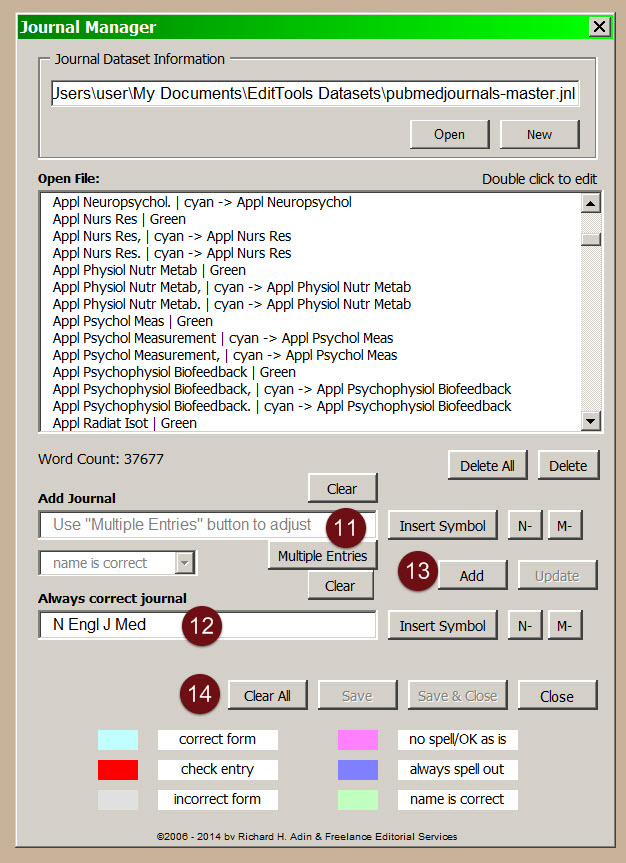
Four EnhancementsThere are 4 enhancements to the Journals Manager. The first is what happens when an incorrect entry is inadvertently added. The second addresses adding variations on a journal theme. A third update adds search capabilities. Finally, a fourth update adds the ability to Save a dataset without having to also close the Manager. First is the ability to correct an incorrect entry in a journals dataset. Previously, the only way to correct an incorrect entry was to delete it and reenter it. Now correction has been simplified. First, double-click on the incorrect journal entry so that the fields are filled in as shown here: 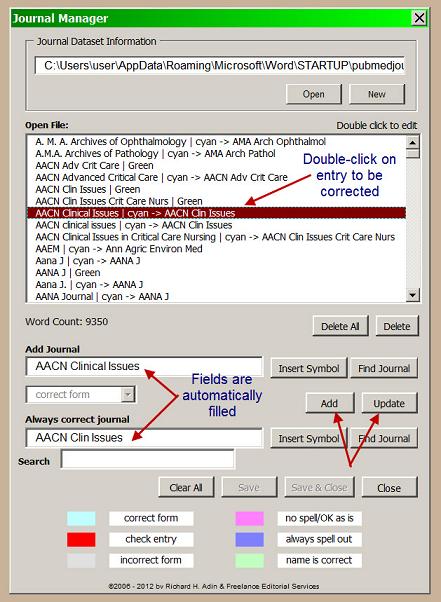
Once the fields are filled in, you can correct whatever is incorrect and then click Update. Clicking Update replaces the incorrect entry in the dataset with the corrected version. The same system works for adding variations on a journal theme. One author may have written AACN Clinical Issues and another author may have written it as Aacn Clin Issues or, which is quite common, one author ends the journal name with a period, another ends it with a comma. And in all these instances, the correct form should be AACN Clin Issues without any ending punctuation. Previously, you had to manually enter each of the variations in order to add the variation to the dataset. Now you simply double-click on an already existing entry for this journal and modify the Add Journal field entry to the newest author variation, then click Add. Clicking Add will add the new variation to the dataset without changing any existing entry. The third update to the Journals Manager is the ability to search the dataset. Typing text in the Search field will highlight the matching entry if it exists in the dataset. The image below shows an example. Typing New highlights the first entry that begins with New. 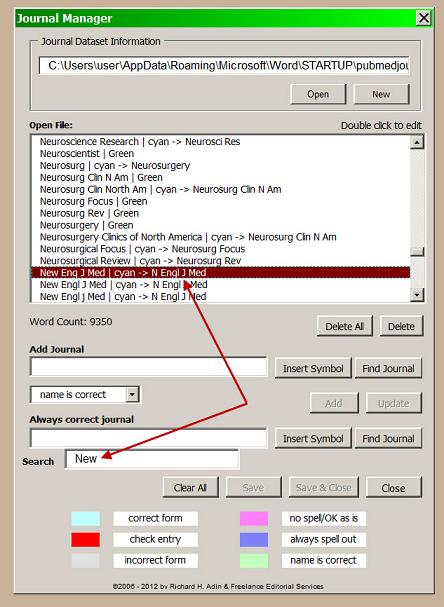
Text AttributesThe basic functions of the Journals macro described below have not changed. What has changed is the interface and the options, as shown here. 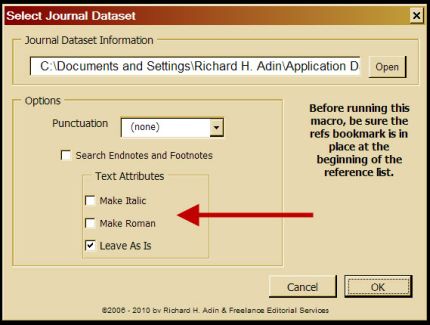
New is the Text Attributes option. The default is to Leave As Is, which means to leave the italic/roman formatting of journal names however they are in the document. Thus if the first entry is italic and the second entry is roman, they will remain italic and roman, even if corrected. However, if you choose Make Italic or Make Roman, journal names that are either highlighted as correct or that are corrected will be made italic or nonitalic, based on your choice. Journals names that are not highlighted or corrected will remain as in the original document and will require manual format change. Original Journals ManagerThe Journals macro is designed to make it easier to correct journal titles in references. The Journals macro is governed by a Manager, shown here. 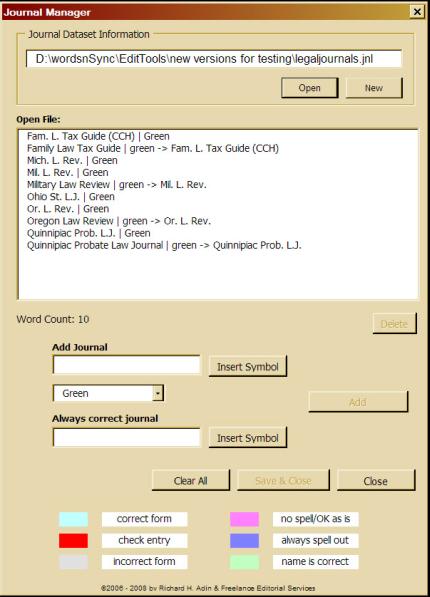
Unlike earlier versions of EditTools, the Journals macro supports any journal name style — including AMA, Chicago, APA, Bluebook, MLA, CSE, and publisher house style. It is fully customizable and you create the individual dataset. Adding Journal TitlesAdding journal titles to the Journals dataset is easy. It is done via the Journals Manager. There are two options for adding a title: First, to add the correct title and second, to add an incorrect title that should be changed to a correct title. To add a correct title, simply enter the title in the Add Journal field as shown below and click Add. This will add the title to the dataset. 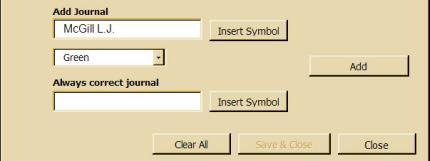
To add an incorrect title that should be changed to a correct title, enter the incorrect form — that is, misspelled, as in Lousiiana Law Review, or in incorrect form, as in Louisiana Law Review rather than La. L. Rev. — in the Add Journal field and the correct form in the Always correct journal field, as shown below. Click Add to add the information to the dataset. 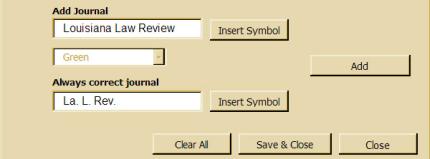
When you add an incorrect and correct form, two entries are made into the dataset, as shown below. The first entry tells the program to change the incorrect instance to the correct form; the second, tells the program what the correct form is so it knows what to highlight. 
Running the Journals MacroTo run the Journals program, select Journals from the Never Spell Word menu in EditTools. Clicking Journals brings up the dialog box shown below where you tell the program which style to apply to journal titles. For our example, we will choose Legal style we have been using. [NOTES: (1) If you have not moved the list of references to a file separate from the main text, it is important that you run the Language macro before you run the Journals macro. See the Language macro information for further details. (2) If you have not moved the list of references to a file separate from the main text, it is important that you add the refs bookmark (spelled exactly as refs) to the line preceding the first reference, usually the title line. This marks the beginning of the section for the macro. It is recommended, however, that you temporarily move the references to their own file when running the macro; if you do, it is unnecessary to add the refs bookmark.] 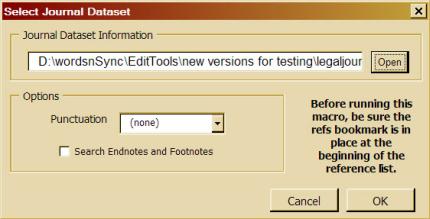 When the Journals macro runs, it produces results similar to that shown here:
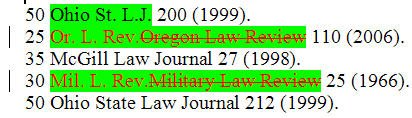
Visual Cues Aid Reference EditingIf the journal title is in the dataset and is correct, it is highlighted in green (e.g., Ohio St. L.J. above). If it is incorrect and in the dataset, the incorrect version is replaced with the correct version with track changes on (e.g., Oregon Law Review changed to Or. L. Rev. above) — no change is made without track changes on regardless of whether you have set it on or off. You can always see what change has been made. Finally, if the journal title is not in the dataset, it is left alone, that is, it is not highlighted (e.g., McGill Law Journal above). This speeds reference editing as you can visually see which titles are correct, which have been corrected, and which you need to check (unhighlighted titles). You build your dataset by adding the unhighlighted titles to it via the Journals Manager, including misspelling and author variations. As your dataset grows, there are fewer titles that need to be checked. Every variation for a title that you add to the dataset will save you a lot of time and effort with future documents. |
Read More
Purchase a license to use EditTools by clicking the link below |