Reference Number Order CheckThis macro has both new features and improved functionality. 
The first improvement is that the beginning number of the delete range (#1) is always prefilled. As numbers are removed from the number list (#7), the beginning number changes. The Remaining Count countdown (#6) has improved accuracy. A major improvement is with the exporting of a renumbering report. In the previous version, clicking Export would export the report as a .txt file to the EditTools Datasets directory and the file name was chosen for you. This has changed. The exporting process now lets you set "header" information that appears on every report. Clicking Export File Header (#3) opens the Header Info Maintenance dialog: 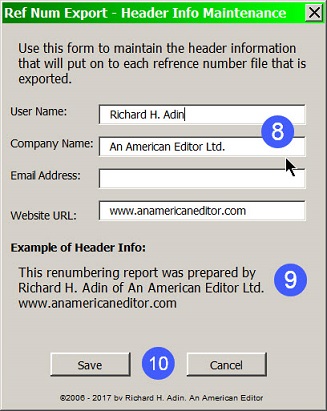
Here you enter your identifying information (#8). The header text that will appear in every reference renumbering report is shown at #9. Click Save (#10) to save your information. Your header information will remain until you change it; no need to enter it anew with each project. When you click Export (#4), the following dialog opens: 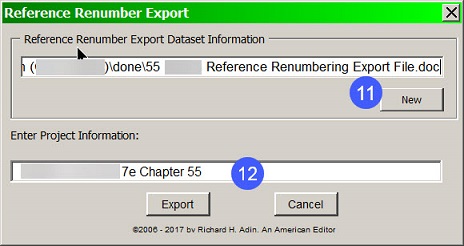
The top field (#11) contains the path and filename information. The information present gives the information for the last exported report. Click the New button to provide a new save destination and filename and to choose either .txt, .doc, or .docx as the file format. In the bottom field (#12) enter the project information, such as "Smith on Rabbits Chapter 98A". The project information, along with the report creation date, will appear below the header in the report. 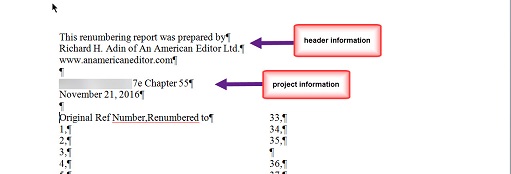
Another new feature of this macro are the 7 text buttons (#2 above). These are customizable buttons that let you create standard text that is inserted into the Renumber field (#A). As you can see in the above image, the first 4 buttons have been customized and the bottom 3 have not. To customize (or change) a button, right-click on the button to open the Custom Button dialog. In the Button Text field (#13) enter the short title you want to appear on the button face (for an example, see the customized buttons above). In the text field (#14), enter the text you want inserted when the button is pressed. Then click Update (#15). 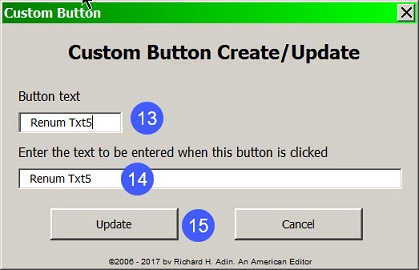
To use the prewritten text, click on the reference number that is to be modified (#16) so that it is entered in the Original field. Then place your cursor in the Renumber field, making the field blank. Click on the button that has the text you want entered (#17). The text will appear in the Renumber field. Click Modify (#18) to enter it in the main Renumber field (#A). 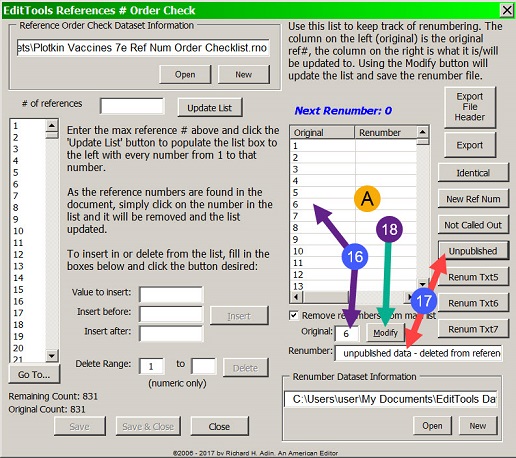
This is how it appears in the Renumber field: 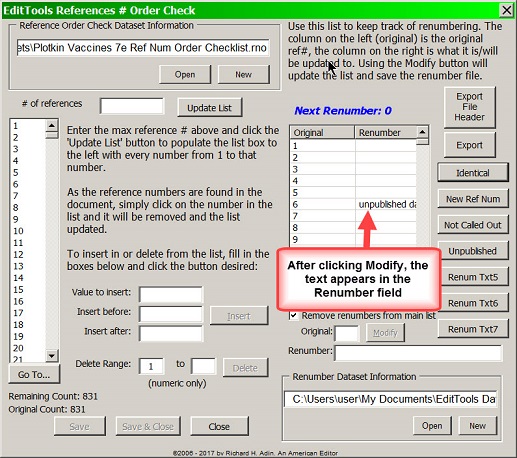
Although not fully visible, this is the text that will appear in the Report to the client: "unpublished data - deleted from reference list and inserted as parenthetical in text". The final change made to References Number Order Check is to make renumbering quicker and easier. Now when you click on an Original number that has to be renumbered, the Renumber field is automatically filled in with the next number. The first time you renumber a reference, you have to manually insert the renumber (#19); that starts the macro's internal counter and the Next Renumber number is shown (#20). Thereafter, to renumber, just click on the Original Number and if the suggested Renumber is correct, click Modify (#21). 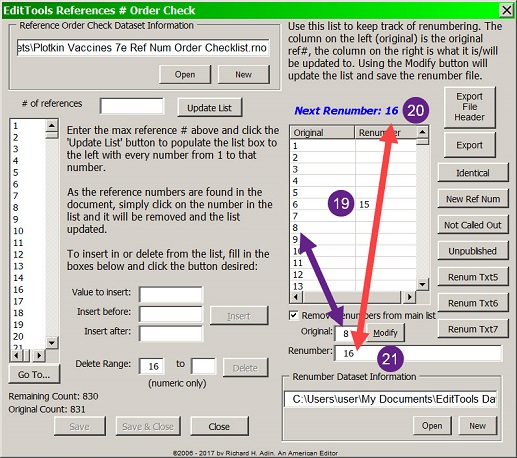
Track Reference RenumberingThe original release of this macro provided a method for verifying that references are called out in order. New is the add ability to track reference renumbering. As the figure below shows, several new features are present. (Not shown is a last-minute new addition — the Go To button.) 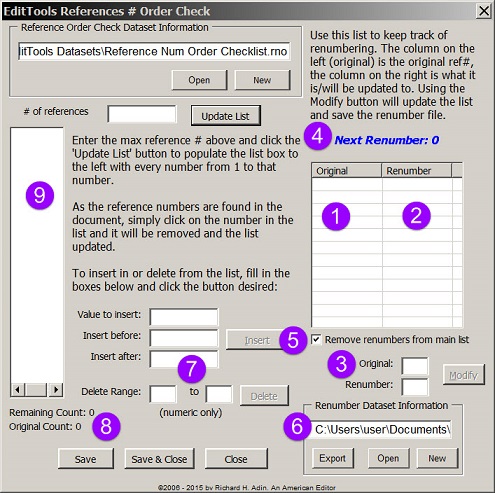
First is the area to track current and new numbers (#1 and #2). The original number and its new number are entered in #3 and the Modify button is clicked to enter the numbers in the appropriate fields in #1 and #2. If #5 is checked, the renumbered items are automatically removed from the original list (#9); if it is not checked, you need to remove the number manually. The next renumber number is shown at #4. When renumbering references, it is good client relations to create a renumber list that can be given to the client for the proofreader to use (as well keep a copy with the archive of edited files in case a question arises in the future). Using #6, you can export the renumbering list to a standard .txt file. There is a default file (Reference Num Order Renumbered List.txt) that is saved to the EditTools Datasets folder, but you can name it specifically for the project (e.g., Gossey Laughter Reference Renumbering.txt) and save it to the folder of your choice, such as the same folder with the edited project files. Also new is the ability to delete a range of numbers (#7) from the primary list (#9). For example, if the author has indicated a callout includes references 10 to 25, you can delete all those numbers from the main list (#9) at one time, rather than one at a time, using this feature (#7). The counter (#8) has also changed. It now shows both the original count and the remaining count. Not shown is the last-minute addition of the Go To button. It appears above the counters (#8). Its primary use is for documents that have a large number of references. Rather than scrolling to locate a number far down the number list (#9), you click Go To and enter the number you want to go to. This is a navigation-only tool. The following images show some of the features in action. First is renumbering. 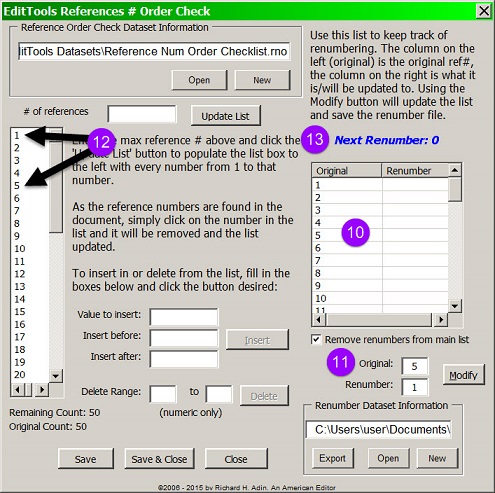
Renumbering begins with locating the original number, that is, the number to be changed. The original number, as it appears in the manuscript (i.e., the number before changing), is found in the left column (#10). The number then has to be inserted in the Original field at #11. There are two ways to enter the numbers. The original number can be entered by clicking on the number in #10, which will automatically enter it in the Original field at #11, or you can put your cursor in the Original field at #11 and manually enter the number. You then enter the new number — that is, the number it is to be changed to — in the Renumber field at #11. For this example, we are going to renumber reference 5 as reference 1 (#11). Also note #12, which shows reference numbers 1 and 5 in the original order number list. Because we have not yet clicked the Modify button (#11), the Next Renumber still shows 0 (#13). 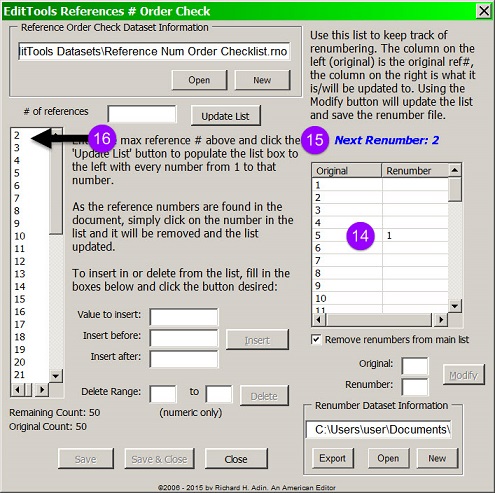
Once the Modify button (#11) is clicked, the dialog changes. The renumber appears in the main field next to the original number (see #14). This allows us to look at this dialog and determine what numbers have changed and to what they have changed. To remind us that the next renumber is 2, the 2 appears at #15. And because the Remove number option (#5) was checked, the number 1 was automatically removed from the original order list (#16). Let us assume that reference 2 is correctly numbered; it can be left or clicked on to remove it from the original number list. The next reference called out should be 3 but, instead, is 7. So we enter 7 in the Original field and 3 in the Renumber field and click Modify (#11). The result is as shown here: 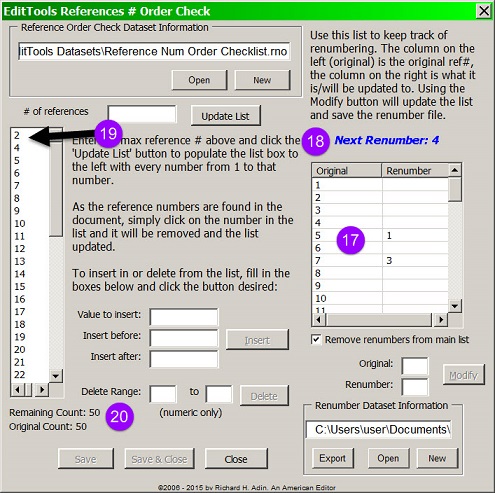
Again, the original and new numbers are seen in the Renumber filed (#17) and the Next Renumber number is 4 (#18). And because the Remove number was left checked, the number 3 has been removed from the Reference Order list (#19) — but not number 2, which needs to removed by clicking on it. You will note that the Counts at #20 have not changed from the original numbers. That is because we have not manually removed a number from the Reference Order list (#19). When we click on the 2 to remove it (#21), the Count updates automatically (#22), as shown here: 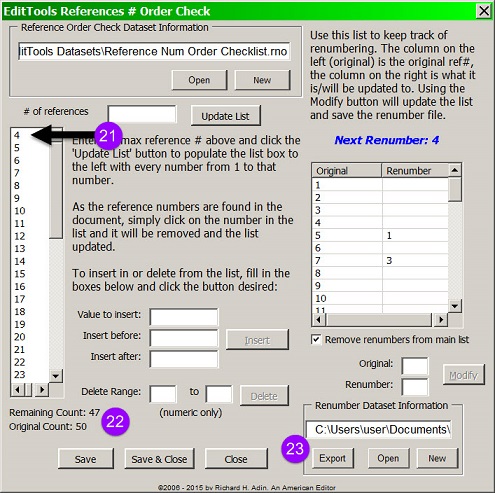
When done with the file, you can export the renumber list by clicking the Export button (#23). You can keep a copy in your records and send a copy to your client. The file is exported as a .txt file and is a simple file as shown here: 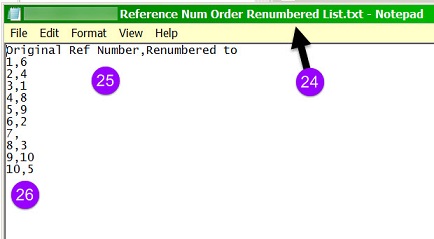
The file is automatically labeled "Reference Num Order Renumbered List" (#24) and automatically saved to the EditTools Datasets directory. You can change the name and location (#23). What is produced is the list shown above. The two columns of numbers (#26) are identified by the head (#25), with the numbers to the left of the comma being the original reference number and numbers to the right of the comma being the renumber numbers. In this example, all references have been renumbered except reference 7. The .txt file can be sent to the client for proofreader use. The Original Reference # Order Check MacroMaking sure that numbered references are called out in order in a document can be a difficult task, especially if there are a lot of references. Most editors use pen and paper to track references. EditTools now offers a different option for tracking reference callouts: Reference # Order Check. Reference # Order Check is found on the EditTools ribbon in the References (A) submenu (B), where it is listed as Ref # Order Check. 
Clicking on Ref # Order Check (B) brings up the dialog for the macro, shown here: 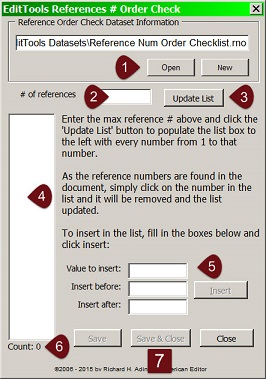
If you work on multiple projects concurrently, you can track the references in each project by saving each project's reference number list to its own file and then opening that file when you next work on the specific project (#1). To populate Reference # Order Check, you enter the last reference number in a document in the # of references field (#2) and click Update List (#3). For example, if your document lists the last reference number as 123, you would type 123 in the # of references field (#2) and then Update the List (#3). The numbers 1 through 123 will appear in the display field (#4). If your document has “a,b” references (e.g., 57a, 62a, 62b, 62c), you can add them to the list using the Insert feature (#5). You would enter the “a,b” value to be inserted in the Value to insert field, then indicate either the number it should be inserted before (Insert before field) or the number it should be inserted after (Insert after field) in the list. The “a,b” number will then appear in the list. For example, to insert 62b, you would type 62b in the Value to insert field and then type either 62c in the Insert before field or 63 in the Insert after field — assuming you had already entered 62a but not 62c in the list. To enter the number, click Insert (#5). The Count (#6) gives you a total count of the number of references and, as with other EditTools macros, you have the option to Save, Save & Close, or Close (#7) the dialog. Let's assume that in our sample document there are 117 references. We would click on Ref # Order Check (B above) to open our dialog in which we would type 117 (#8) and click Update List (#9). 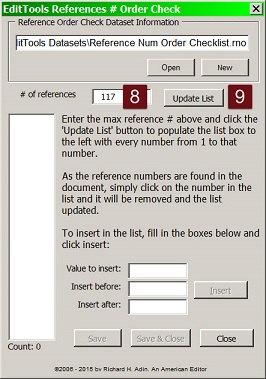
Clicking Update List populates the reference number list field (#9). 
If the reference list also has a reference numbered 102a, that number would be added to the list by typing the number in the Value to insert (#10) and typing either 103 in the Insert before (#11) field or typing 102 in the Insert after (#12) field and then clicking Insert (#13). 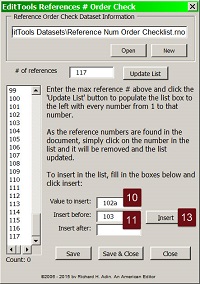
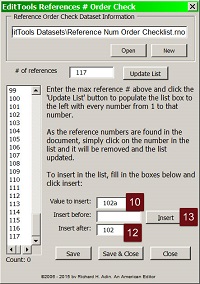 As shown here, the number 102a is automatically entered (arrow). Clicking Save & Close (#14) saves the number list. 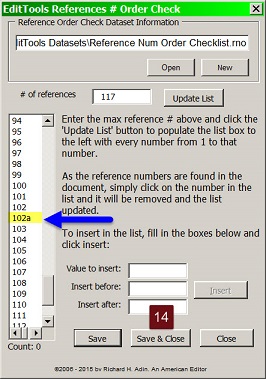
When Reference # Order Check is reopened, the saved number list appears (as demonstrated by the inclusion of 102a in our example [#15]) and the count now displays the total number of reference numbers as 118 (#16), which is our original 117 plus the addition of 102a. 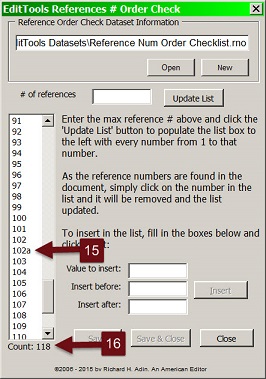
In the excerpt from our sample document, the reference callouts have been highlighted. The first called out reference is 1 (#17), which we long ago came across; the next is 43 (#17). 
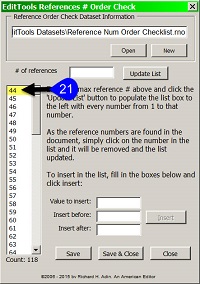
A look at the Reference # Order Check dialog tells us that 43 is the next reference number that should be called out (#20), so we single-click on number 43 in the number field (#20) to remove it from the list. That will move the number 44 to the top of the list (#21), indicating that it is the next expected-to-be-found-in-the-document number. 
 However, the next reference number in our document is 47 (see #18 above), not the expected 44 (#21). This tells us that reference callouts 44, 45, and 46 are not called out in number order or may not be called out in the document at all. As editors, we would take the next necessary steps to deal with this problem. Some other points: Using our example, if you Save & Close Reference # Order Check at this point (after 43 has been removed from the number field) and reopen Reference # Order Check, your number list still begins with 44 as the first number (#22) but your count (#23) now indicates the number of numbers remaining in the number list. If you just Save, then the file is saved but the count (#23) does not change. The count changes when the file is refreshed as a result of its being closed and reopened. 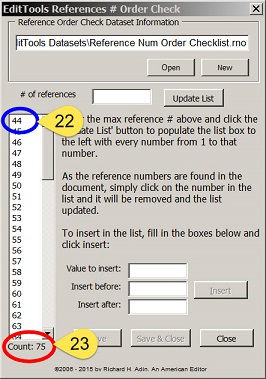
Finally, numbers can be removed from the number field in any order; just click on a number. If you accidentally delete a number, reinsert it using the procedure outlined above for inserting a number (#10 to #14). Reference # Order Check replaces the pen-and-paper method of tracking reference callouts. The best way to track figures and tables is to use EditTools' Bookmarks. See Bookmarks for additional information. |
Read More
Purchase a license to use EditTools by clicking the link below |