BookmarksThe functionality of the Bookmarks macro has been enhanced with several new features. The new dialog looks like this: 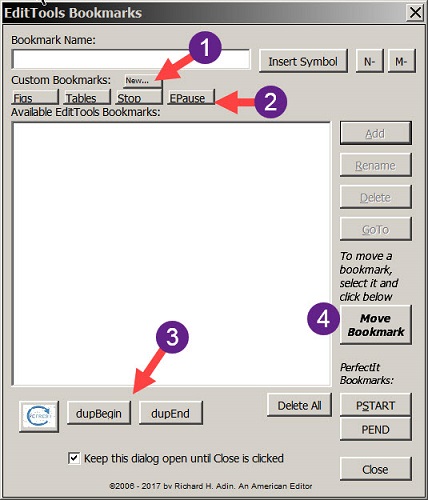
The new features are numbered. The first new feature is the ability to create 1-click custom bookmarks (#1). In the above image, there are 4 custom bookmarks (#2). The second new feature is the addition of preset bookmarks (#3) that are used with the Find Duplicate References macro. (See the discussion of the Find Duplicate References macro for additional explanation.) To create a custom 1-click bookmark, click the New button (#1). Doing so opens this dialog: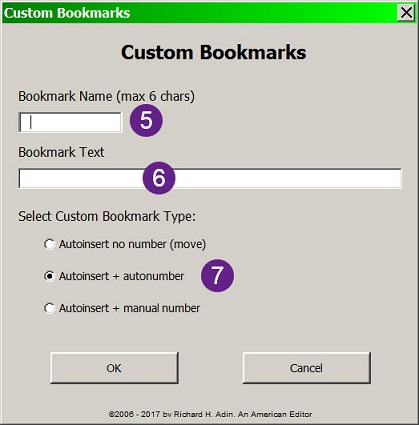
Here is where you create the custom bookmark. Give the bookmark a name (#5). Note that the name is limited to 6 characters. Then set the text for the bookmark (#6). Every time you click on the button that represents this bookmark, this is the text that will be entered when the bookmark is created. The final step is to select the type of bookmark (#7). The first option ("Autoinsert no number [move]") will cause the text to be inserted in the manuscript at the location of the cursor. If the bookmark has been previously placed in the text, clicking the button will move the existing bookmark from its current location to the new location. Examples are the FPause and the Stop buttons (#2 above). The standard way to move a bookmark is to select the bookmark and click the Move Bookmark button (#4 above). Choosing this option and creating a custom bookmark eliminates the need to select the bookmark and to click Move Bookmark. The second option, "Autoinsert + autonumber" is ideal for those items where the only change is in number of the bookmark. Two good examples are the Figs and Tables bookmarks at #2. The first time the Figs button is clicked, "Fig 001" is inserted as a bookmark (without the quote marks); the second time it is clicked, "Fig 002" is inserted; and so on. TIP: Add a space at the end of the name to avoid the number abutting the text as in "Fig001". The third option is "Autoinsert + manual number". In this instance, the text of the bookmark will be entered but you have to manually supply any numbering. TIP: Make this choice if you want to add either a number or text or both to finish the standard part of the bookmark. Here is a new bookmark, TeSt: 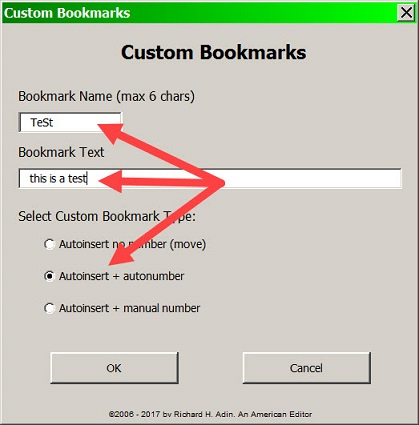
After clicking OK, the custom button appears on the Bookmarks dialog: 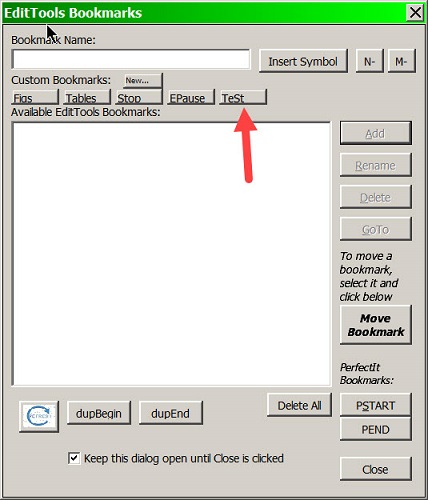
If the TeSt button is clicked, the appropriate bookmark is inserted: 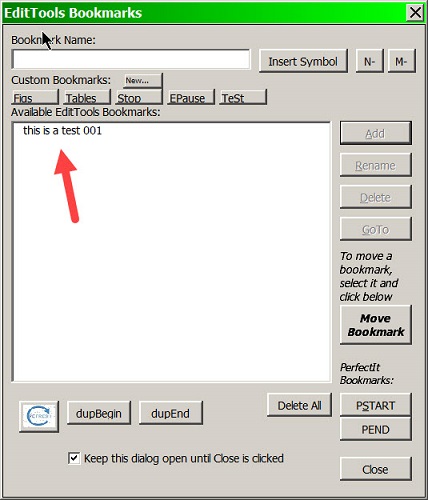
Right-clicking on the button accesses the button-editing options: 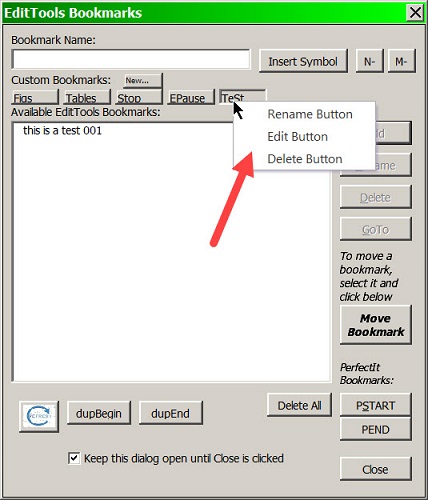
Choosing Edit Button opens the Edit Custom Bookmarks dialog where changes can be made to the button's name, bookmark text, and/or the bookmark type. Clicking Update activates the changes: 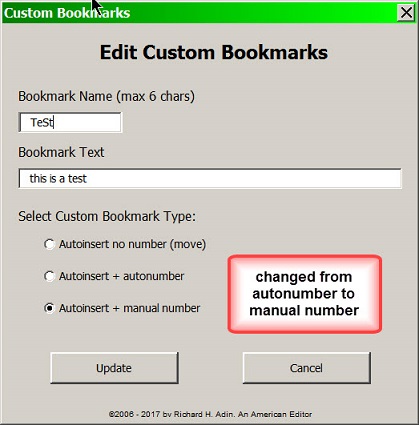
With the change from autonumber to manual number, the next time TeSt is clicked, you will be asked to insert the number (or text) you want as shown below. When the dialog opened, only "this is a test " was present. Because the custom button was set to manual number, the highlighted text could be added. 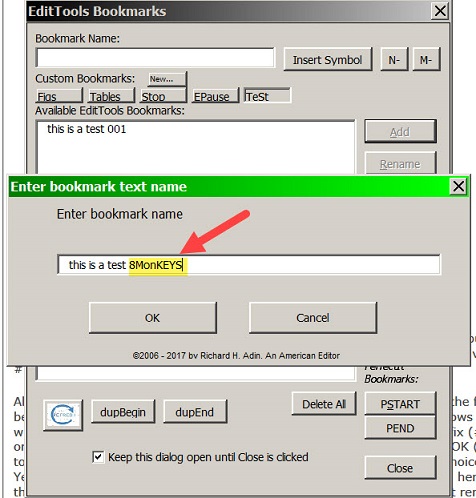
Clicking OK inserted the bookmark in the text. 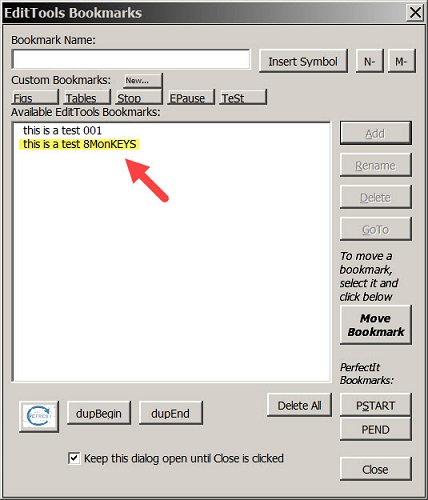
Revisions to OriginalYou can use Word symbols in a bookmark name, including en and em dashes (#1): 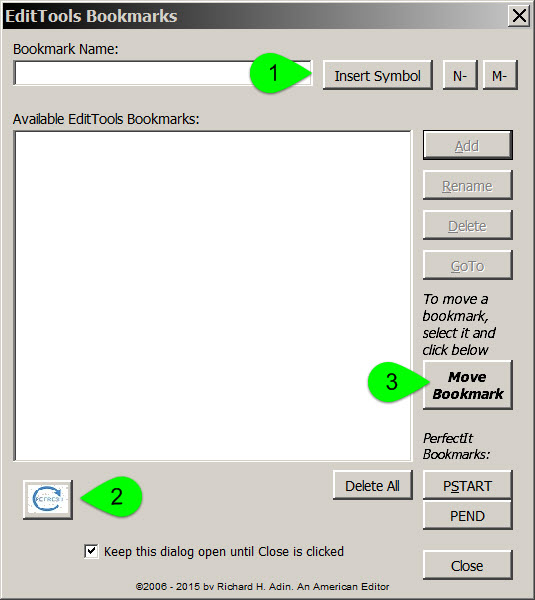
In addition, you can refresh the list of available bookmarks by clicking the button at #2. The button to move a bookmark has been modified to make it more visible #3. Also new in version is an improved method of renaming bookmarks. As the figure below shows, you can now set defaults for renaming. The "manager" shows you what bookmark is to be renamed (#4). You can use a prefix (#5), a suffix (#6), or both. The new name appears in the To: field (#7) for approval. Click OK (#9) to rename the bookmark. The Clear To: textbox when opened offers a choice of Yes or No (#8). If you have selected defaults for renaming, as was done here, then when you open the form, you will see in the To: textbox the default rename if "No" is chosen (as in the image). You can then click OK. If you chose "Yes", you will not see the new name without clicking on choices in the Prefix (#5) and/or Suffix (#6) fields. 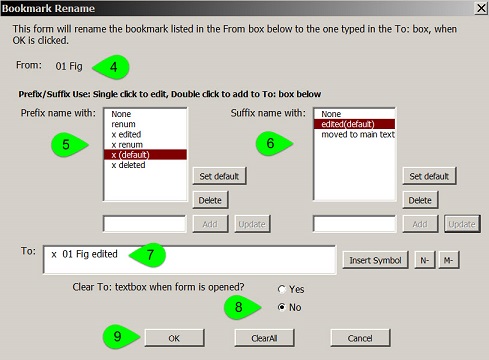
The Original BookmarksBookmarks can help an editor in many ways. Unlike Word's Navigation Pane, bookmarks can take you to a precise location. In addition, Word's Navigation Pane relies on using standardized styles in a hierarchy so that you can navigate among sections. But the Navigation Pane doesn't let you label a specific item. Of course, if you remember what the item is that you want to find, you can use Word's Find pane. But bookmarks are a better method for more precise locations. Bookmarks in Microsoft WordUnfortunately, Word doesn't make using bookmarks easy. To insert a bookmark in Word, you need to go to the Insert tab (A in below image) and select Bookmark (B). 
Selecting Bookmark opens the dialog shown here: 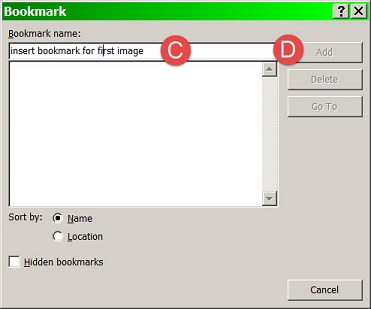
If you try to enter a descriptive, easy-to-read bookmark with spaces (C in above image), or a bookmark that includes a mix of letters and numbers, such as “insert bookmark for image 1,” the Add button remains unavailable (D above). Instead, Word wants letters or numbers only and no spaces, as shown at E below. Now the Add becomes accessible (F). 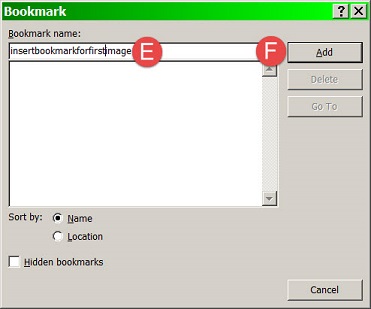
In addition, when clicking Add, the bookmark is inserted and the dialog is closed automatically, which means that to access the bookmark, I need to go through steps 1 and 2 above again, then click on the bookmark, and, finally, click Go To, which closes the bookmark dialog again. EditTools' BookmarksI like to make extensive use of bookmarks when I edit, so Word's system is not really usable, not when time is money. The solution is EditTools' Bookmarks. 
Clicking on Bookmarks on the EditTools ribbon, opens the EditTools Bookmarks dialog, shown below. 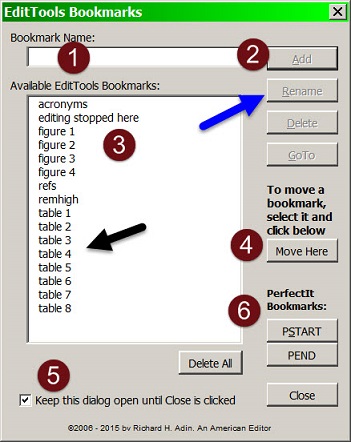
The above image shows a list of already inserted bookmarks in a document. When you open a document in Word and then open Bookmarks, Bookmarks will populate itself (#3) and list whatever bookmarks are already in the document. You can either keep them, delete specific ones, or click Delete All to delete the bookmarks from the document. Inserting a bookmarkTo insert a bookmark, enter its name in the Bookmark Name field (#1). As you can see by looking at the list of bookmarks already included (#3), you can use spaces and mix letters and numbers. After entering the name, click Add (#2) to add the bookmark to your document and to the list of bookmarks (#3). I make it a point to go through a document and insert “primary” bookmarks, that is, one for each figure legend and table legend, and one for where I want the “refs” bookmark used by Never Spell Word and other macros located. I also insert one at each obvious other place, that is, a place that I know I may need to return to as I edit the document, such as a list of acronyms used in the document. “Secondary” bookmarks are added as I edit. For example, if the author calls a software program EMMA when I first come across it, I will insert a bookmark such as “EMMA software 1st use”. If I discover later that the author spells it “EmMA,” I can easily return to the first use and query the spelling. If the document is fiction, I might bookmark “Jason blue eyes” or “Konowitz 1st use” — things that I need to be sure are watched for. Moving a bookmarkMoving a bookmark is a hassle in Word. In Word, you have to open the bookmark dialog, select the bookmark, delete it, then recreate it. With EditTools' Bookmarks, you select the bookmark to be moved and click Move Here (#4). This is particularly useful for my “editing stopped here” bookmark. I use that bookmark to indicate my current location in the document when I need to go to another location, for example, to table 5. (By the way, I have learned that the best way to number tables and figures is to use two digits, such as table 05, rather than the single digit shown in the image. The reason is that if there are 10 or more figures or tables, using the leading zero ensures that the tables and figures are listed in number order.) I move the bookmark, click on the name of the bookmark at the new location, and click Go To. When I am ready to return to where I had been in the document, I click on my “editing stopped here” bookmark and click Go To. PerfectIt usersIf you are a PerfectIt user, Bookmarks offers you an easy way to set the area that PerfectIt should check: beginning and ending bookmarks (#6). Click on PSTART to insert a bookmark where PerfectIt should begin and PEND to insert an ending bookmark. When you run PerfectIt, it will search and report on the text between the two bookmarks. For more information, see PerfectIts' Help files. Keeping the dialog openAnother features of EditTools' Bookmarks is the ability to keep the dialog open (#5). In Word, the bookmark dialog closes automatically. In EditTools, you have a choice (#5). I like keeping the dialog open because I am constantly accessing bookmarks. But if you prefer closing and reopening the dialog as needed, you have two choices: You can click Bookmarks on the EditTools tab (black arrow in below image) or you can assign Bookmarks to a “hotkey” combination by clicking Hotkeys on the EditTools tab (red arrow). 
Clicking Hotkeys brings up the Hotkeys dialog shown below. Click Setup Hotkey to open the dialog to actually assign a key combination to Bookmarks. 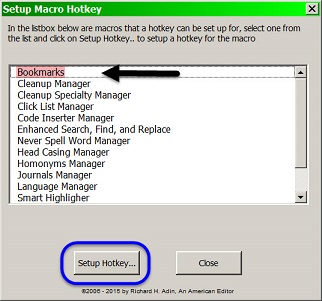
Renaming a bookmarkI use bookmarks to track callouts of figures and tables (and anything else that needs special attention, such as formulas). With Word's bookmark system, this was doable but time-consuming and prone to error. Of course, another way to do it is the old-fashioned paper-and-pen method. EditTools' Bookmarks makes this much easier and reduces the chance of error. As mentioned earlier, I assign a bookmark to each figure and table legend before I begin editing (see image below). When I come to the first callout for, for example, table 1, my procedure is as follows. 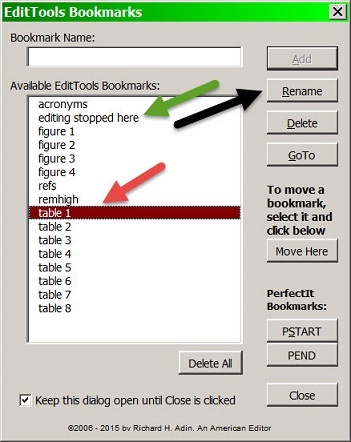
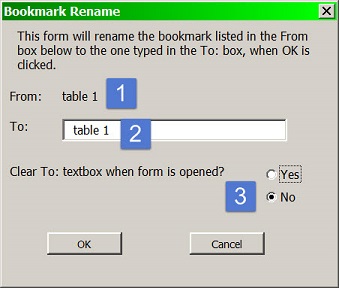
The Rename dialog shows the current name (#1) and includes that name in the To: (or rename) field (#2). I have chosen for the name to reappear in the To: field by choosing No (#3). If I had chosen Yes as my default, then the To: field would be blank. After editing table 1, I want to rename the bookmark so that I know (a) I have edited it and (b) it has already been called out in the document. However, I may need to look at the table again, so I want table 1 to keep a bookmark. Consequently, what I do is add an x as a prefix to the current name, as shown here (#4); however, the bookmark's renaming is not limited to the x I use — it can be anything that works for you: 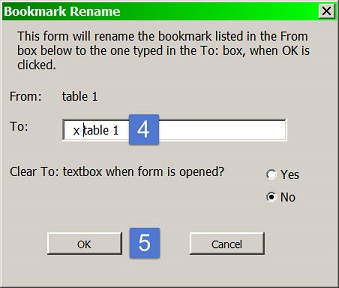
When I click OK (#5), the bookmark remains in place but is renamed to “x table 1” as shown in the image below (blue arrow). The bookmark now moves to the end of the list and from looking at the Bookmarks dialog, I can tell that the next table callout should be for table 2. 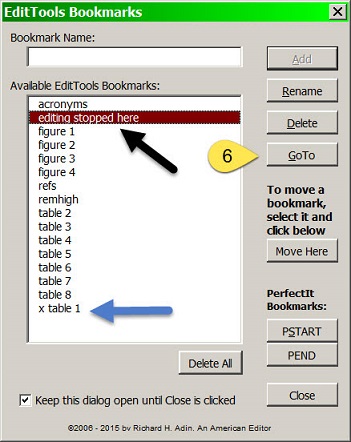
To return to where I was in the document before going to table 1, I can click on “editing stopped here” (black arrow) and click Go To (#6). For a better idea of how I make use of the Bookmarks macro, look at the image below. I can see that the next table callout should be for table 3 (#1), that tables 1 and 2 have been edited and called out (#2), that figure 4 still hasn't been called out (#3), but that figures 1 to 3 have been (#4). 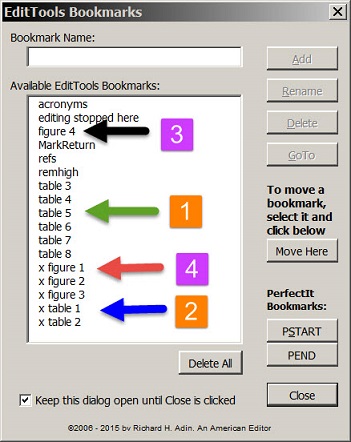
If the next callout I encounter is for table 5, I can see at a glance that table 5 is not being called out in number order, which allows me to renumber or query, depending on my client's instructions. If I renumber, I can move or rename the bookmarks. EditTools' Bookmarks makes it easy. |
Read More
Purchase a license to use EditTools by clicking the link below |