Code InserterThe Code Inserter Manager has a couple of new options that make coding, and editing, easier. The new functions are the ability to group codes (#1) and to have a code also apply a language (#2). 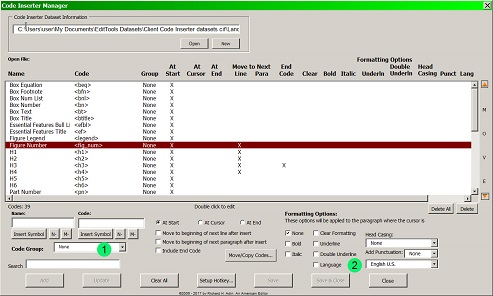
New to version 8 is the ability to organize codes by groups. To see groups that are available, click the down arrow (#3 below). The list of existing groups will be shown (#4). When a code has been assigned to a group, it is noted in the main field (#5). 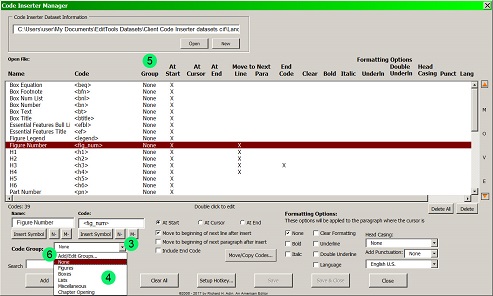
To create a new group or edit an existing group, click Add/Edit Groups (#6) to open the dialog shown below. It is likely you will need to scroll up to see this option. This dialog is also where you organize the order of the groups. 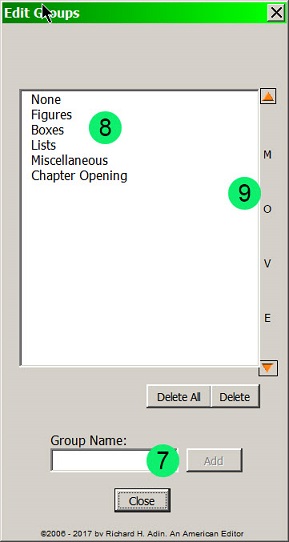
To create a new group, enter the name in the Group Name field (#7) and click Add. To change or edit an existing name, double-click on the name in the main field (#8). The name will appear in the Group Name field (#7). Edit it and click Update. To reorder the groups, select a group by clicking on its name (#8) and then use the Move feature (#9) to move the group up or down the list. To delete a group, select the group and click Delete. Grouping lets you organize codes and to place them in an order that is convenient for you when applying the codes. As the image below shows, when the Code Inserter macro (rather than the Manager) is run, the codes are grouped (#10) and ordered (#11) according to your preference. Note that the group name appears (#10) with the codes that are part of the group listed under the group name (#11). 
Compare the above to the previous method shown at the bottom of this web page (scroll down). Also new in this release is the ability to set the language for each code (#12 and #13). 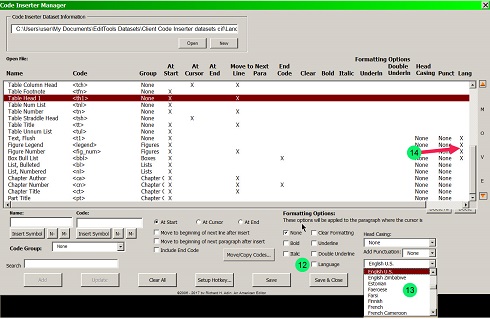
Select the language using the dropdown (#13). The list includes Word's list of available languages. The language you choose remains the default until you select another language. To include the instruction in a code, check the Language box (#12). If a language instruction is included in a code, it is denoted in the main field as an attribute of the code (#14). Revisions to OriginalThe Code Inserter Manager has several new options. Its options now conform with those available in Style Inserter. The image below shows the new Manager interface: 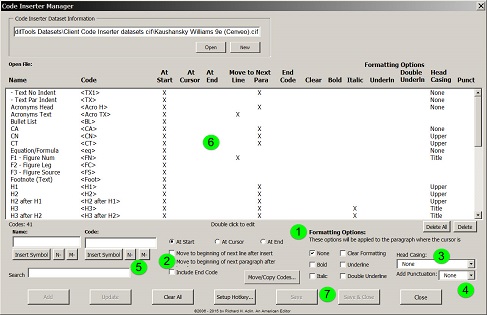
Formatting options — None, Bold, Italic, Clear Formatting, Underline, and Double Underline — have been added (#1). None adds no formatting to the paragraph or text to which the Code is being added; Clear Formatting removes any formatting that has been applied to the text being coded. For example, if you set the code <H3> for an italic level 3 heading, and will be applying the code to this text: Yesterday's Walk in the Woods when you apply the <H3> code using the Code Inserter macro, that head will be changed to: <H3>Yesterday's Walk in the Woods The format options do not apply to the code; they apply to the text to which the code is being attached. Code Inserter also lets you choose the Head Casing (#3). The choices are None (i.e., leave as is), Lower, Sentence, Title, and Upper. As to what words will be altered, casing is governed by the information in the Heading Case Manager (see the Casing macro for more information and how to access the Head Casing Manager). When you apply a code for which you have set the Head Casing, the text will be changed to reflect that choice. Thus, in our example, if the H3 code includes the instruction to make the head italic and Sentence case, the head would appear as follows: <H3>Yesterday's walk in the woods You can also set the macro to automatically add ending punctuation (#4). The options are period, comma, colon, semicolon, question mark, exclamation point. In our example, if you had set the H3 parameters to always add a question mark (in addition to italics and sentence casing), applying the code using the Code Inserter macro would result in this: <H3>Yesterday's walk in the woods? In addition to the previous options as to what should happen after the coding is entered, there is now an option to have the cursor move to the beginning of the next paragraph (#2). Using this option makes it easy to insert the next relevant code. Finally, the EditTools standard N- and M- buttons have been added (#5) to make it quicker and easier to insert these dashes if needed. As with the original version, your choices are displayed in the main field (#6). One last improvement, but a very important one: In the original version of Code Inserter, if you made a change using the Manager — whether adding a new code or modifying an existing one — the change was reflected only in the Manager, not in Inserter if Inserter was open when the change was made in the Manager. To have Inserter reflect the change, Inserter had to be closed and reopened. In version 7, after making a change using the Manager, click either Save or Save & Close (#7) to have the change immediately appear in Inserter. This change lets you keep both Inserter and the Manager open as you code a document and also lets you make on-the-fly changes — adding new codes, modifying existing codes — and having them available and applied immediately. The Original Code InserterCode Inserter is designed to make inserting codes into manuscripts quicker and easier. Code Inserter is a new top-level menu item as shown here: 
The Code Inserter menu includes these options (see image below): Run Code Inserter, Code Inserter Manager, Activate "Run CI" Button, and Deactivate "Run CI" Button: 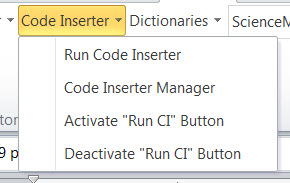
The process begins with the Insert Code Manager, which is shown here: 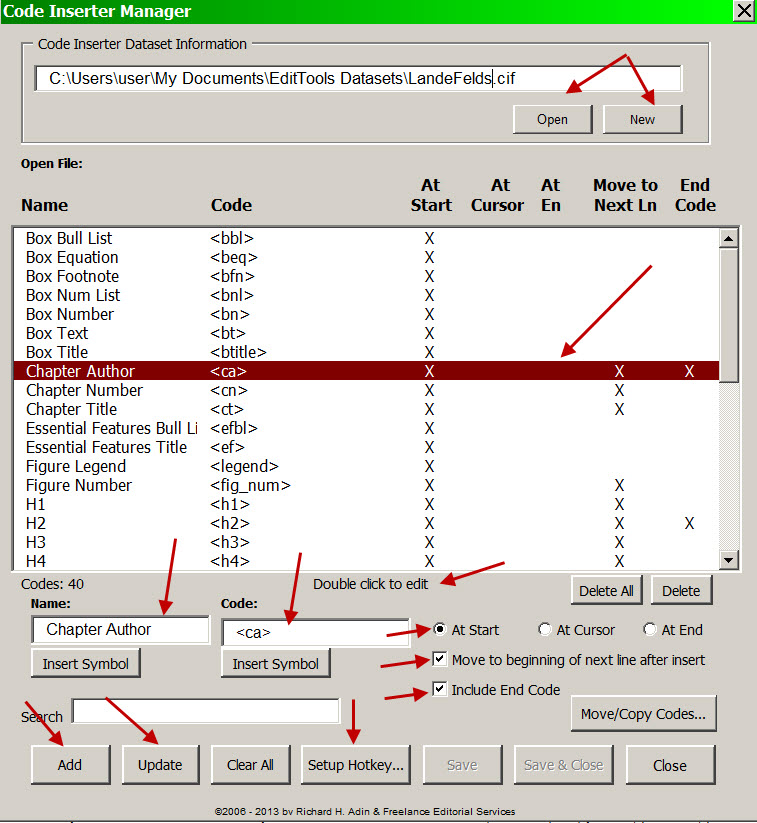
As you can see from the image, there is a lot going on in the Manager. The Manager has the usual Open and New options. You can create a generic coding system for a client or one tailored to a specific project. You can also copy codes from one file to another using the Move/Copy Codes button. If it is a new file, the Manager will be empty. You enter a name for the code in the Name: field (Chapter Author in the example) and the code that is to appear in the manuscript in the Code: field (<ca> in the example). You then indicate where the code is to be inserted: At the start of the line (At Start), at the location of the cursor (At Cursor), or at the end of the line (At End). You also indicate whether, after inserting the code, your cursor should move to the next line automatically. Finally, you indicate whether an end code is needed. If the code is a new code, click Add to add it to the dataset; if you are correcting or editing an existing entry, click Update. If you look in the main data field (where all of the codes in the dataset are listed), you will see that Chapter Author is highlighted. By looking across, you can see the name you gave the code, the code that will be entered, and which options you chose for that code (the Xs). Note the Setup Hotkey button. Hotkeys are a new feature for several of the EditTools macros. This allows you to assign a key combination to run the macro. As shown in the image below, you can assign any keyboard combination to be the hotkey for this macro. NOTE: The hotkey runs the Code Inserter macro; it DOES NOT open the Manager. 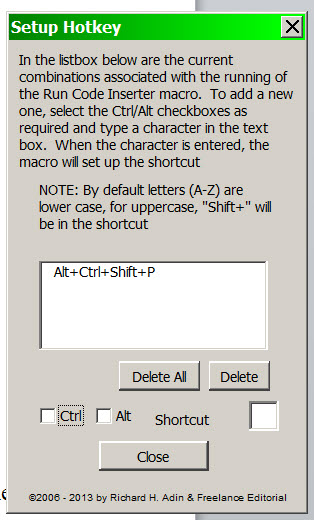
When you run the Code Inserter macro, it brings up the box shown below, listing all of the codes you have created alphabetically by name. 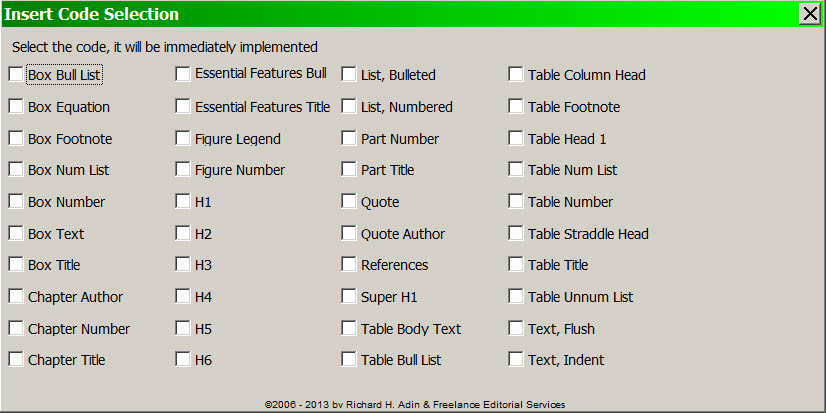
Just click on a code's name or the checkbox next to the name, and the code will be automatically inserted according to the instructions you gave. 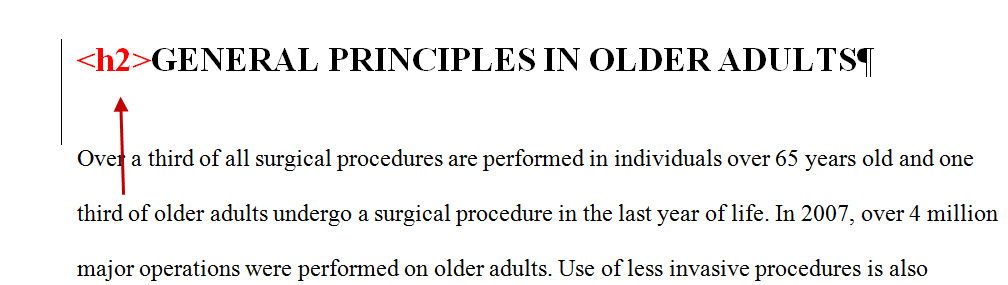
If you also need an end code, the following dialog box will appear: 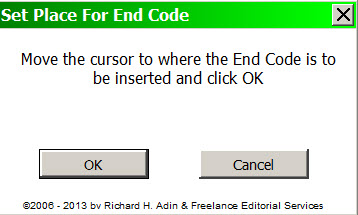
Clicking OK will cause the end code to be inserted where you indicated and your cursor will return to where the beginning code was placed. 
As indicated earlier, the Code Inserter menu also has an option called Activate "Run CI" Button. If you click this option, a button called Run CI appears in the main menu bar as shown below. Instead of using a hotkey to activate the macro, you can use this button. (The Deactivate "Run CI" Button deactivates this button and removes it from the menu bar.) 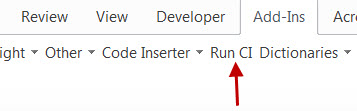
With the Run CI button on the main menu bar, you click it, instead of using hotkeys, to run the Code Inserter macro, which is the dialog from which you choose the code to insert. |
Read More
Purchase a license to use EditTools by clicking the link below |