Stripping Notes to Text
You may know that it is possible to turn embedded notes into text simply by saving a document in text format. A disadvantage of doing so is that all character formatting is lost. Because notes typically contain lots of book titles in italic, this is a serious problem—thus the need for a program that will strip embedded notes to text while leaving their formatting intact.
NOTE: If you’ve used Word’s Revision Tracking feature in your documents, you’ve probably noticed that Word has a bug that prevents it from actually deleting notes when Revision Tracking is turned on. The notes are marked as deleted in your document text, but if you open the notes pane and look, they’re still in there. NoteStripper will actually delete such notes before proceeding. If it didn’t, these semi-deleted notes would cause problems. NoteStripper will, however, leave your other tracked revisions intact.
To strip notes to text, click the NoteStripper menu at the top of your Word screen. Then click “Notes to Text.”
NoteStripper will ask which documents you would like it to work on:
1. The active document.
2. All open documents.
3. All documents in a folder.
Choose the option that fits your needs.
Stripping All Documents in a Folder
If you need to strip notes from all documents in a folder, first copy them to a working folder called something like “Copy.” That will leave your original documents intact in case you need something to go back to. Also, make sure only the documents you want to strip are in the Copy folder. Then you won’t inadvertently strip, say, some press-ready documents that you have spent many hours editing and formatting. Show all files to be sure.
In addition, make sure none of the documents is protected or read only. NoteStripper strips your documents and then saves them. If the documents are protected or read only, NoteStripper will not work. You may also run into problems if your files need to be converted into Microsoft Word from a different word-processing format. Please make sure all of your files are in Microsoft Word format before running the program.
If you select the option to strip all the documents in a folder, NoteStripper presents a dialog box that allows you to select the folder to which you have copied the documents to be stripped (leaving your original documents safe in their original folder). After you have carefully selected the Copy folder (don’t get the wrong one!), click the OK button or press ENTER to continue.
NoteStripper strips out notes in order from the beginning to the end of a document. That means if all of your chapters are in one section in a long document, the notes will be stripped and numbered consecutively throughout the document and not within each individual chapter. If you want your notes to be numbered starting with 1 in each chapter, you’ll need to separate your chapters with section breaks or put each chapter into an individual document.
NoteStripper Options
After letting you choose the documents you want to work on, NoteStripper presents you with certain options about how it will run.
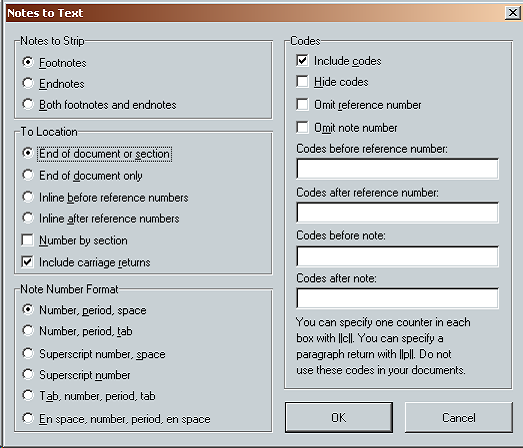
Notes to Strip
The first option lets you choose the type of note to strip:
1. Footnotes.
2. Endnotes.
3. Both footnotes and endnotes. Most of the time, this is the option you’ll want to use.
If you choose both footnotes and endnotes, NoteStripper will convert your endnotes to footnotes and then strip all of the notes together. If you try to strip footnotes first and then strip endnotes later, you’ll end up with duplicate note numbers in your document, which you don’t want. I’ve included the option to strip footnotes or endnotes separately, however, for the day when, for some reason, you need to do so. If I know publishing, that day will come sometime.
To Location
The second item lets you specify the location where you want the notes to go. You can place them in these locations:
1. End of document or section. If your document doesn’t have sections, this option will correctly strip notes to the end of your document. Otherwise, it will strip them to the ends of the sections containing the notes.
2. End of document only. This option strips notes only to the end of the document and not to the ends of sections. If your document has sections and you’re planning to re-embed the notes later, don’t use this option. If you’re going to get rid of section breaks later, and you really do want all notes at the end of the document, this is the option to use.
3. Inline before reference number.
4. Inline after reference number.
“Why,” you might ask, “would I want to place my notes inline?” You may need such an option if you’re stripping notes to text so you can import them into certain typesetting programs. Corel Ventura, for example, needs to have notes inline. Kytek’s fXT XTension for QuarkXPress also works best if notes are stripped inline before the reference number. For more information, consult the documentation for your typesetting program.
There are two last options here: “Number by section” and “Include carriage returns.”
Number by Section. If you select “Number by section,” NoteStripper will restart note numbering at 1 for each section rather than numbering notes consecutively.
Include Carriage Returns. If you’re stripping notes to the end of the document, you’ll almost always want to include carriage returns. In fact, if you choose the option to strip notes to the end of the document or the ends of sections, the option to include carriage returns is automatically checked, even if you previously unchecked it for some other option. If you want it off, you can turn it off, but you’ll have to work at it. Someday you’ll thank me for making it hard. If this option is checked and you’re stripping notes to the end of the document, NoteStripper will simply include the carriage return that came at the end of each note—thus preserving the paragraph style of the note (such as Footnote Text). If you’re stripping notes inline, NoteStripper will still include that carriage return, but it will also insert an additional carriage return at the beginning of each note. If you need to customize this further (such as including a carriage return at the beginning but not at the end of an inline note), turn this option off and include carriage return codes with your notes as explained below under “Codes.”
Note Number Format
The third item lets you choose the style of note numbering to use in the extracted notes:
1. A number followed by a period and a space.
2. A number followed by a period and a tab.
3. A superscript number followed by a space. (“Superscript” here actually means the Footnote Reference or Endnote Reference character style, however it’s formatted.)
4. A superscript number. (“Superscript” here actually means the Footnote Reference or Endnote Reference character style, however it’s formatted.)
5. A number preceded by a tab and followed by a period and a tab. (This option makes it possible to align note numbers on the tabs.) NOTE: If you’re planning to re-embed your notes later (see “Stripping Text to Notes,” below), don’t use this option. Instead, use option 1, 2, 3, or 4.
6. A number preceded by an en space and followed by a period and an en space (the traditional typographical way of setting note numbers in a list). If you have less than ten notes, no en space will be added. If you have ten or more notes, the appropriate number of en spaces will be added to align all of your note numbers properly. NOTE: If you’re planning to re-embed your notes later (see “Stripping Text to Notes,” below), don’t use this option. Instead, use option 1, 2, 3, or 4.
Other numbering options, such as letters, Roman numerals, and special characters, are not available.
Codes
If you like, you can add typesetting codes to your notes so they can be imported into programs like Corel Ventura, fXT, and TeX. Your options are:
1. Include codes. Instructs NoteStripper to include codes. It also makes available the other coding options below.
2. Hide codes. Hides the codes around the notes so that if you’re adding other typesetting codes, the note codes won’t get in the way. For example, the Editorium’s QuarkConverter program can insert a Quark XPress tag that will prevent a hyphenation break on the last word in a paragraph. This tag would not work properly, however, if it was inserted in the middle of a note code. So NoteStripper gives you the option to hide these codes in case you have other processing to do that might affect them. It hides them simply by formatting them with Word’s Hidden formatting (Format > Font > Hidden).
3. Omit reference number. Some typesetting programs, such as Corel Ventura, don’t need a reference number included with note coding. This option allows you to leave it out.
4. Omit note number. Some typesetting programs, such as Corel Ventura, don’t need a note number included with note coding. This option allows you to leave it out.
Under these options are text boxes where you can insert the codes you need to include with your notes. You can include:
1. Codes before the reference number.
2. Codes after the reference number.
3. Codes before the note.
4. Codes after the note.
To include the codes you need, type them into the appropriate boxes. You can also leave a box or boxes blank. You can include a paragraph code and a counter code (as defined by NoteStripper) in each box. (You cannot use the paragraph code in the document itself, or NoteStripper will convert it into a carriage return.)
The paragraph code is:
||p||
This code tells NoteStripper to insert a carriage return at the point where you include the code.
The counter code is:
||c||
NoteStripper will insert an incremented number at the point you insert one of these codes, starting with 1 and ending with the number of your last note (for the document or section, depending on your settings). For example, if you have 15 notes, the counter would start with 1 and end with 15. Here’s an example of the codes needed before and after an inline note with Kytek’s fXT XTension for QuarkXPress, showing the counter code in use:
[[FR f||c|| M=20p]]
[[E f||c||]]
In the document itself, NoteStripper would enter the following actual codes for note 7 (for example):
[[FR f7 M=20p]]
[[E f7]]
After you’ve set your options and entered any codes you need, click “OK” to have NoteStripper strip out the notes. If there are lots of them, it may take awhile, so please be patient. When NoteStripper is finished, it will let you know.
Please note that NoteStripper turns off marking of revisions while it works.