NoteStripper
Thank you for using NoteStripper for Microsoft Word!
NoteStripper provides a variety of tools for working with notes. Using NoteStripper, you can:
1. Strip Word’s embedded, automatically numbered footnotes or endnotes to the bottom of a document (or section) as numbered text, replacing the note reference numbers in the text with superscript numbers. (This is especially useful if you need to import a document with notes into a typesetting program, such as QuarkXPress or PageMaker, without losing character formatting, such as italic.) You can also strip them inline with any typesetting codes you specify for use in such programs as Ventura or Kytek’s fXT Quark XTension.
2. Strip text notes at the bottom of a document into embedded footnotes or endnotes.
3. Strip embedded footnotes or endnotes into parenthetical text.
4. Strip parenthetical text into embedded footnotes or endnotes.
NoteStripper also includes various utilities to make working with notes easier.
This version of NoteStripper (3.00) includes several enhancements and fixes over previous versions:
1. The ability to strip notes to or from the ends of sections.
2. The ability to include tags around notes and to strip them inline for use in such typesetting programs as Corel Ventura, TeX, and fXT, with great flexibility in specifying tags and placement.
3. The ability to turn inline, tagged notes into embedded notes.
4. The use of Footnote Reference and Endnote Reference character styles (rather than just superscript) to format note numbers when stripping notes to text.
5. The addition of two new note formats: (1) tag, number, tag (for better number alignment), and (2) en space, number, en space (for traditional typographical alignment).
6. The true deletion of notes that were deleted during editing with Revision Tracking on, which a bug in Word otherwise prevents from being deleted.
7. The preservation of numbers that begin the text of a note (“1999 was a good year . . . ). In previous versions, these were seen as part of the note number being stripped and were thus deleted.
I strongly recommend that you try NoteStripper several times on a variety of test documents until you understand fully how it works and what it can do. Also, before running NoteStripper at any time, be sure to back up your documents. That way, you’ll have something to go back to if you’re not satisfied with the results.
You shouldn’t use this version of NoteStripper with our Editor’s ToolKit Plus program, which includes an earlier version of NoteStripper and may not work properly if you try to use both programs at once. To avoid the problem, just temporarily turn off Editor’s ToolKip Plus.
By using NoteStripper, you accept the terms of agreement found at the end of this document. The first time you run NoteStripper, the terms of agreement will appear on your screen. Please read them carefully. If you accept the terms, you will be able to use the program. If not, you will not be able to use it.
Global Templates
NoteStripper is basically a collection of macros in a template. You don’t use this template as you would an ordinary template by attaching it to a document. If you try to do that, you’ll run into problems. Instead, you “add” it to Microsoft Word as a global template or add-in (see installation instructions below).
Because the template contains macros, some virus-checking programs or even Word itself may warn you that the template could contain Word viruses. Please rest assured that it does not. Our macros have been carefully checked and tested to make sure they are safe and usable. If you have any question about this, you can download the program from our Web site at www.editorium.com. You may need to adjust Word’s macro security settings so that the macros in the program can operate. If Word asks if you want to “enable macros” when using this program, your answer should be yes. Otherwise, the program won’t work. Please see your Word documentation for more information.
Stripping Notes to Text
You may know that it is possible to turn embedded notes into text simply by saving a document in text format. A disadvantage of doing so is that all character formatting is lost. Because notes typically contain lots of book titles in italic, this is a serious problem—thus the need for a program that will strip embedded notes to text while leaving their formatting intact.
NOTE: If you’ve used Word’s Revision Tracking feature in your documents, you’ve probably noticed that Word has a bug that prevents it from actually deleting notes when Revision Tracking is turned on. The notes are marked as deleted in your document text, but if you open the notes pane and look, they’re still in there. NoteStripper will actually delete such notes before proceeding. If it didn’t, these semi-deleted notes would cause problems. NoteStripper will, however, leave your other tracked revisions intact.
To strip notes to text, click the NoteStripper menu at the top of your Word screen. Then click “Notes to Text.”
NoteStripper will ask which documents you would like it to work on:
1. The active document.
2. All open documents.
3. All documents in a folder.
Choose the option that fits your needs.
Stripping All Documents in a Folder
If you need to strip notes from all documents in a folder, first copy them to a working folder called something like “Copy.” That will leave your original documents intact in case you need something to go back to. Also, make sure only the documents you want to strip are in the Copy folder. Then you won’t inadvertently strip, say, some press-ready documents that you have spent many hours editing and formatting. Show all files to be sure.
In addition, make sure none of the documents is protected or read only. NoteStripper strips your documents and then saves them. If the documents are protected or read only, NoteStripper will not work. You may also run into problems if your files need to be converted into Microsoft Word from a different word-processing format. Please make sure all of your files are in Microsoft Word format before running the program.
If you select the option to strip all the documents in a folder, NoteStripper presents a dialog box that allows you to select the folder to which you have copied the documents to be stripped (leaving your original documents safe in their original folder). After you have carefully selected the Copy folder (don’t get the wrong one!), click the OK button or press ENTER to continue.
NoteStripper strips out notes in order from the beginning to the end of a document. That means if all of your chapters are in one section in a long document, the notes will be stripped and numbered consecutively throughout the document and not within each individual chapter. If you want your notes to be numbered starting with 1 in each chapter, you’ll need to separate your chapters with section breaks or put each chapter into an individual document.
NoteStripper Options
After letting you choose the documents you want to work on, NoteStripper presents you with certain options about how it will run.
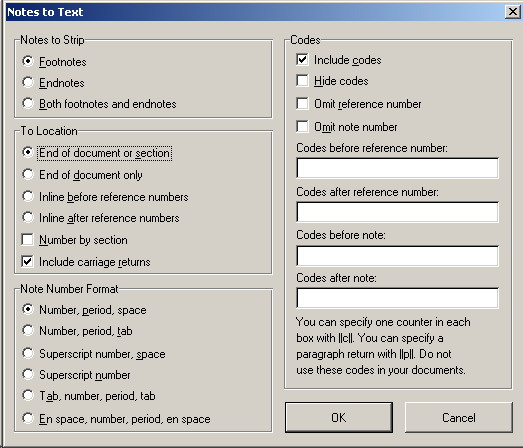
Notes to Strip
The first option lets you choose the type of note to strip:
1. Footnotes.
2. Endnotes.
3. Both footnotes and endnotes. Most of the time, this is the option you’ll want to use.
If you choose both footnotes and endnotes, NoteStripper will convert your endnotes to footnotes and then strip all of the notes together. If you try to strip footnotes first and then strip endnotes later, you’ll end up with duplicate note numbers in your document, which you don’t want. I’ve included the option to strip footnotes or endnotes separately, however, for the day when, for some reason, you need to do so. If I know publishing, that day will come sometime.
To Location
The second item lets you specify the location where you want the notes to go. You can place them in these locations:
1. End of document or section. If your document doesn’t have sections, this option will correctly strip notes to the end of your document. Otherwise, it will strip them to the ends of the sections containing the notes.
2. End of document only. This option strips notes only to the end of the document and not to the ends of sections. If your document has sections and you’re planning to re-embed the notes later, don’t use this option. If you’re going to get rid of section breaks later, and you really do want all notes at the end of the document, this is the option to use.
3. Inline before reference number.
4. Inline after reference number.
“Why,” you might ask, “would I want to place my notes inline?” You may need such an option if you’re stripping notes to text so you can import them into certain typesetting programs. Corel Ventura, for example, needs to have notes inline. Kytek’s fXT XTension for QuarkXPress also works best if notes are stripped inline before the reference number. For more information, consult the documentation for your typesetting program.
There are two last options here: “Number by section” and “Include carriage returns.”
Number by Section. If you select “Number by section,” NoteStripper will restart note numbering at 1 for each section rather than numbering notes consecutively.
Include Carriage Returns. If you’re stripping notes to the end of the document, you’ll almost always want to include carriage returns. In fact, if you choose the option to strip notes to the end of the document or the ends of sections, the option to include carriage returns is automatically checked, even if you previously unchecked it for some other option. If you want it off, you can turn it off, but you’ll have to work at it. Someday you’ll thank me for making it hard. If this option is checked and you’re stripping notes to the end of the document, NoteStripper will simply include the carriage return that came at the end of each note—thus preserving the paragraph style of the note (such as Footnote Text). If you’re stripping notes inline, NoteStripper will still include that carriage return, but it will also insert an additional carriage return at the beginning of each note. If you need to customize this further (such as including a carriage return at the beginning but not at the end of an inline note), turn this option off and include carriage return codes with your notes as explained below under “Codes.”
Note Number Format
The third item lets you choose the style of note numbering to use in the extracted notes:
1. A number followed by a period and a space.
2. A number followed by a period and a tab.
3. A superscript number followed by a space. (“Superscript” here actually means the Footnote Reference or Endnote Reference character style, however it’s formatted.)
4. A superscript number. (“Superscript” here actually means the Footnote Reference or Endnote Reference character style, however it’s formatted.)
5. A number preceded by a tab and followed by a period and a tab. (This option makes it possible to align note numbers on the tabs.) NOTE: If you’re planning to re-embed your notes later (see “Stripping Text to Notes,” below), don’t use this option. Instead, use option 1, 2, 3, or 4.
6. A number preceded by an en space and followed by a period and an en space (the traditional typographical way of setting note numbers in a list). If you have less than ten notes, no en space will be added. If you have ten or more notes, the appropriate number of en spaces will be added to align all of your note numbers properly. NOTE: If you’re planning to re-embed your notes later (see “Stripping Text to Notes,” below), don’t use this option. Instead, use option 1, 2, 3, or 4.
Other numbering options, such as letters, Roman numerals, and special characters, are not available.
Codes
If you like, you can add typesetting codes to your notes so they can be imported into programs like Corel Ventura, fXT, and TeX. Your options are:
1. Include codes. Instructs NoteStripper to include codes. It also makes available the other coding options below.
2. Hide codes. Hides the codes around the notes so that if you’re adding other typesetting codes, the note codes won’t get in the way. For example, the Editorium’s QuarkConverter program can insert a Quark XPress tag that will prevent a hyphenation break on the last word in a paragraph. This tag would not work properly, however, if it was inserted in the middle of a note code. So NoteStripper gives you the option to hide these codes in case you have other processing to do that might affect them. It hides them simply by formatting them with Word’s Hidden formatting (Format > Font > Hidden).
3. Omit reference number. Some typesetting programs, such as Corel Ventura, don’t need a reference number included with note coding. This option allows you to leave it out.
4. Omit note number. Some typesetting programs, such as Corel Ventura, don’t need a note number included with note coding. This option allows you to leave it out.
Under these options are text boxes where you can insert the codes you need to include with your notes. You can include:
1. Codes before the reference number.
2. Codes after the reference number.
3. Codes before the note.
4. Codes after the note.
To include the codes you need, type them into the appropriate boxes. You can also leave a box or boxes blank. You can include a paragraph code and a counter code (as defined by NoteStripper) in each box. (You cannot use the paragraph code in the document itself, or NoteStripper will convert it into a carriage return.)
The paragraph code is:
||p||
This code tells NoteStripper to insert a carriage return at the point where you include the code.
The counter code is:
||c||
NoteStripper will insert an incremented number at the point you insert one of these codes, starting with 1 and ending with the number of your last note (for the document or section, depending on your settings). For example, if you have 15 notes, the counter would start with 1 and end with 15. Here’s an example of the codes needed before and after an inline note with Kytek’s fXT XTension for QuarkXPress, showing the counter code in use:
[[FR f||c|| M=20p]]
[[E f||c||]]
In the document itself, NoteStripper would enter the following actual codes for note 7 (for example):
[[FR f7 M=20p]]
[[E f7]]
After you’ve set your options and entered any codes you need, click “OK” to have NoteStripper strip out the notes. If there are lots of them, it may take awhile, so please be patient. When NoteStripper is finished, it will let you know.
Please note that NoteStripper turns off marking of revisions while it works.
Stripping Text to Notes
Stripping text to notes means transforming text notes at the end of a section or document into “embedded” Word footnotes or endnotes—the kind you get by clicking the “Insert” menu, clicking “Footnote,” and clicking the other note options you want to use. Embedded notes are easy to edit because they automatically renumber—you don’t have to change note numbers by hand if you delete notes or add them. In addition, if you have a mass of typed notes that are misnumbered, stripping text notes to embedded ones numbers the notes consecutively as they should be.
Definitions
To keep things clear, here are definitions for several terms that are used often in the instructions that follow:
Body text: The main text of your document.
Note reference: A superscript character in body text that refers to a note.
Note: A footnote or endnote.
Note number: The number at the beginning of a note. (Not to be confused with a note reference.)
Note text: The text of a footnote or endnote.
Here is a sample “document” that contains all of these elements:
This is body text, followed by a note reference.1
1. This is a note. It begins with a note number and contains note text.
Rules for Stripping Text to Notes
Before stripping text notes to embedded notes, you must make sure your document follows certain rules:
1. It must have the same number of notes and note references. If the number of notes and references appears to be different, the program will tell you, and you’ll have to fix the problem before the program will run. The problem may be that some of your note references are formatted as raised rather than superscript, so NoteStripper doesn’t see them as references. Or, you may have a space or tab in front of some of your notes. If so, NoteStripper won’t see them as notes and so won’t count them. Another possibility is that whoever typed the note numbers (not references) sometimes used ells for ones. If a note has more than one paragraph, and one of those additional paragraphs starts with a number [“1999 was a good year . . .”], NoteStripper will see it as a note number, which will also mess up your count, so you’ll need to edit such paragraphs so they don’t begin with a number. If your document has sections, it must have the same number of notes and note references within each section, which is why it may not be a good idea to strip notes to text to the end of the document only and not to the ends of sections (see “To Location” under “Stripping Notes to Text,” above).
2. Note references must be formatted as superscript, either directly or with a character style, or with the Footnote Reference or Endnote reference character style. If they’re formatted not as one of those but as raised text (or something else), the program won’t work. If you need to, you can use Word to find raised formatting and replace it with superscript formatting before using the program. (Note references don’t have to be numbers; they can also be letters or other characters. They cannot, however, be embedded note reference numbers, which are not actually numbers but are rather a special code.)
3. If you tell the program to find note numbers formatted as superscript (see “How to Strip Text to Notes,” below), nothing but note references must be formatted as superscript in your document’s body text. This is because the program sees any other superscript body text (as in “1st” or “2nd” or “3rd” or “4th”) as a note reference. Your note numbers, however, can be superscript without causing any problems. Watch out for spaces that have been formatted as superscript—but you can search for these, just as you can ordinals. If you tell the program to find note numbers formatted as Footnote Reference or Endnote reference character styles (see “How to Strip Text to Notes,” below), then you don’t have to worry about this.
4. Note references must be positioned in your text where you want the embedded notes to be. In other words, the embedded notes will be placed where the note references initially appear.
5. The notes must be the last thing in the document or section of the document. They must follow the body text at the end of a section or document, and they can’t have other text following them within a section or at the end of a document. If they do, the program will see that text as part of the last note.
6. Each note must begin with a note number, include some note text, and end with a carriage return. A note cannot begin with a space, tab, or other non-numerical character. Numbers only! Otherwise, NoteStripper has no way to recognize a note as a note. (You can search for problem notes with the code string ^p^w^# using Word’s Find feature. This will find any number preceded by a tab or space preceded by a carriage return.) A single note may, of course, include more than one paragraph.
7. Note numbers must be composed of numbers: 1, 2, 3, 4, 5, 6, 7, 8, 9, and 0. Letters and other characters will not work because the program sees them as note text, not as part of a note number. (Note: Previous versions of NoteStripper saw an initial number following a note number [“3. 1999 was a good year . . .”] as part of the note number and stripped it out. This problem is now fixed.)
Fortunately, most reasonably formatted documents already follow these rules. That means you may not have to do anything to your document before stripping text to notes. However, it doesn’t hurt to look over a document and make sure that the rules have been followed. (And be sure to back up your document before running the program in case you don’t get the results you wanted.)
You should also know that note numbers can be followed by a period and a space (or a tab), but they don’t have to be. Note numbers can have any formatting, including superscript, and they can have any number of digits. Also, you can have as many notes as you want. Finally, your document can include notes that are already embedded. The new notes will be stripped in with the existing notes where they belong.
Here is an example of a document that would work properly:
This is body text.1 This is body2 text. This is body text.3
1. This is note text.
2. This is note text.
3. This is note text.
Here’s another example, using superscript note numbers:
This is body text.1 This is body2 text. This is body text.3
1This is note text.
2This is note text.
3This is note text.
And believe it or not, this example would also work just fine because it follows the rules above, however strange it may look:
This is body text.54 This is bodyabc text. This is body text.2
33. This is note text.
4500 This is note text.
8This is note text.
In each of these cases, after stripping text to notes, you’d get a document that had the notes embedded and automatically renumbered. The document would look like this (with the notes embedded, of course):
This is body text.1 This is body2 text. This is body text.3
1 This is note text.
2 This is note text.
3 This is note text.
How to Strip Text to Notes
To strip text to notes, follow these steps:
1. Open the document in which you want to strip text to notes.
2. Place your cursor at the beginning of the notes, either at the end of a section or the end of your document. (This is so important that the program will ask you if you have done it. If you haven’t, but you say you have, the program will see any paragraph beginning with a number [like this paragraph] as a note and report that you have unmatched notes and note references.)
3. Click the NoteStripper menu at the top of your Word screen.
4. Click “Text to Notes.”
5. Answer the questions that appear on your screen.
The following dialog will be displayed:
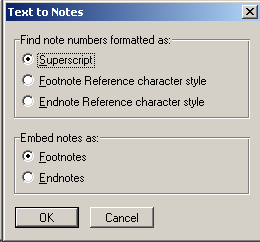
Select the options you want to use. You can have the program look for note references formatted as superscript, Footnote Reference character style, or Endnote Reference character style. Which one you choose, of course, depends on how the note references are actually formatted in your document. Usually, they will simply be superscript, and even if they’re formatted with one of the character styles, they are still likely to be superscript. Let’s say, however, that they’re formatted with one of the character styles, and you tell the program to find note references formatted with that style. Then your document can contain superscript text other than note references without warning you that note references and note numbers don’t match. Please note, too, that NoteStripper’s Notes to Text feature (see above) does format note references in the character styles and not just as superscript.
After the program runs, your typed notes will be embedded as automatically renumbering Word notes. Then, if you like, you can use Word’s note options to change numbering schemes, formatting, and so on. See your Word documentation for more information.
Stripping Delimited Text to Notes
On occasion, you may encounter documents with notes included as inline text in some kind of delimiters, <<like this.>> You can use NoteStripper to turn such notes into true embedded footnotes or endnotes. Tagged text from typesetting programs—Ventura, for example—often includes delimited notes, as do many public-domain texts available on the Internet. To use this feature:
1. Click the NoteStripper menu.
2. Click “Delimited Text to Notes.”
3. Specify the documents you want to use.
3. In the dialog box, enter the beginning and ending delimiters used with your inline notes. You can use Word’s standard Find codes in these boxes if you need to. For example, you can use ^p to specify a carriage return and ^t to specify a tab.

4. Select footnotes or endnotes.
5. If your document contains more than one section, you can tell the program to restart numbering at 1 in each section. If you don’t select this option, notes will be numbered consecutively throughout the document.
6. Click the “OK” button.
Stripping Notes to Parenthetical Citations
In some documents you may decide that source citations should appear in parentheses rather than in footnotes or endnotes. In that case, you can use NoteStripper to strip out Word’s embedded notes and place the note text in parentheses where the note references used to be. You can do this with footnotes, endnotes, or both.
To do so:
1. Click the NoteStripper menu at the top of your Word screen.
2. Click “Notes to Parenthetical Text.”
3. Answer the questions on your screen.
Your notes will be converted into parenthetical citations.
After the program is finished, you may want to go through your document to see if some of the citations should be in brackets rather than in parentheses. This would be true if the program placed a parenthetical citation at the end of text that is already in parentheses, or if your notes already contained publication information in parentheses. I’ve provided a program to help you solve this problem. To run the program, click “Check for Nested Parentheses” under the NoteStripper menu. The program will identify the first nested parentheses it sees. Then it will stop so you can fix them. To find more nested parentheses, run the program again. For ease of use, this program is also available from the NoteStripper button bar.
Stripping Parenthetical Citations into Notes
In some documents you may decide that source citations should appear in footnotes or endnotes rather than in parentheses in the document’s body text. In that case, you can use NoteStripper to strip out the parenthetical citations and turn them into Word’s embedded, automatically renumbering footnotes or endnotes.
To do so:
1. Click the NoteStripper menu at the top of your Word screen.
2. Click “Parenthetical Text to Notes.”
The program will ask you to choose the type of notes you want to convert:
1. Footnotes.
2. Endnotes.
Click the option you want, then click “OK.”
Next, the program will ask you to choose the type of entries you want to convert:
1. All entries.
2. Individual entries.
Click the option you want, then click “OK.”
If you select “Individual entries,” the program will find each occurrence of parenthetical text and present you with several options:
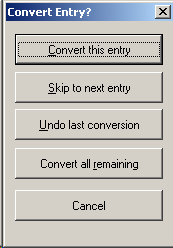
1. Convert the current entry.
2. Go to the next entry, leaving the current entry untouched.
3. Undo the previous conversion.
4. Convert all remaining entries from the cursor position to the end of the document.
5. Cancel the program at the current cursor position.
Converting entries individually takes longer than having the program do them all automatically, but it allows you to preserve parenthetical text that should not be turned into a note. If you’re certain that everything in parentheses should be turned into a note, click “All entries.”
If you have only a few places where parentheses should be preserved, and you know where they are, you could manually change them into something like three “at” signs: @@@. Then you could have NoteStripper automatically convert the other parenthetical citations. Finally, you could go back and change all occurrences of three “at” signs into the proper parentheses.
Transposing Reference Numbers and Punctuation
After you’ve stripped parenthetical text to notes, you may find that you’ll need to transpose reference numbers and punctuation, depending on the format of your original parenthetical text. For example, if you’ve formatted parenthetical text the way it appears after this sentence, you’ll have no problem. (Lyon, Using NoteStripper, p. 10.) This parenthetical note is self-contained because the preceding sentence and the note itself both end with a period. The note text will convert perfectly into an embedded note because it ends with a period, and the reference number will appear to the right of the sentence’s period, where it belongs, like this.1
However, if you’ve formatted parenthetical text the way it appears after this sentence, you’ll have problems (Lyon, Using NoteStripper, p. 10). The text of the note will be embedded without a final period because the text inside the parentheses has no period. In addition, the reference number will appear to the left of the sentence’s period, like this1. (I’m tempted here to go off on a diatribe about other reasons why this form of citation is wrongheaded, but I’ll try to resist.)
As part of NoteStripper, I’ve supplied a program to help you fix this problem. The program transposes each reference number with the punctuation that follows it. Depending on how your notes are punctuated, however, the program may not fix them perfectly. After running the macro, you’ll need to look at your notes to make sure they’re formatted and punctuated to your liking. If your notes had no terminal punctuation inside their parentheses, you’ll have to add it after they’re embedded. Sorry, but this is too complicated for a program to handle automatically.
To transpose notes and punctuation:
1. Click the NoteStripper menu at the top of your Word screen.
2. Click “Transpose Notes and Punctuation.”
The program will ask you to choose which punctuation you would like to include. Your options are:
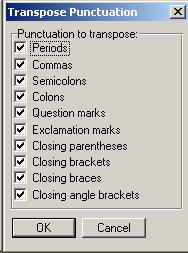
1. Periods.
2. Commas.
3. Semicolons.
4. Colons.
5. Question marks.
6. Exclamation marks.
7. Closing parentheses.
8. Closing brackets.
9. Closing braces.
10. Closing angle brackets.
Select as many of these as you’d like. The program will transpose only the notes that are followed by the punctuation you have selected.
Next, the program will ask which notes you’d like to transpose:
1. All notes.
2. Individual notes.
If you choose all notes, the program will run automatically, without your intervention.
If you choose individual notes, the program will stop at each instance of a note followed by the punctuation you specified and ask if you want to transpose. You can:
1. Transpose the note and punctuation.
2. Go to the next instance of a note with punctuation, leaving the current instance untouched.
3. Undo the previous transposition.
4. Transpose all remaining instances from the cursor position to the end of the document.
5. Cancel the program at the current cursor position.
Turning Open-Style Parenthetical Notes into Closed Ones
You can use NoteStripper to turn open-style parenthetical notes into closed ones. To do so:
1. Strip the parenthetical notes into embedded notes.
2. Transpose the embedded notes and punctuation as needed.
3. Add terminal punctuation to the embedded notes as needed.
4. Strip the embedded notes into parenthetical text.
Converting Notes
Buried deep in Microsoft Word’s Insert menu are three commands that allow you to convert footnotes to endnotes and vice versa. You can convert notes in selected text or in an entire document. I’ve included these commands on NoteStripper’s menu and button bar for easy access. They include:
1. Convert Footnotes. This command converts footnotes to endnotes.
2. Convert Endnotes. This command converts endnotes to footnotes.
3. Swap Notes. This command converts footnotes to endnotes and endnotes to footnotes.
4. Convert Notes. This command converts selected notes to either footnotes or endnotes.
Using NoteStripper’s Toolbar
NoteStripper includes a toolbar with buttons that activate all of NoteStripper’s functions. The toolbar includes several other handy features for working with notes, including buttons to take you to the next or previous footnote or endnote. You can turn the toolbar on or off as you would any other toolbar in Word:
1. Under the View menu, choose Toolbars.
2. Check or uncheck the box next to the NoteStripper toolbar.
3. Click “OK.”
To see what each button does, use your mouse to point at the button. Then wait a few seconds. A description of the button’s function will appear in a “tool tip” box near your cursor, and a more complete description will appear in the status bar at the bottom of your Microsoft Word window.